Showing posts with label How-To. Show all posts

Monday, November 26, 2018

Literary Christmas Ornament DIY

15 comments:

For someone that can't sew a button, or stitch a thread, I really love to find ways to be creative and even better if it's good enough to show off or gift!

A few years ago I did a project I'd been wanting to do for as long as I could remember. I wanted to use my original, completely falling apart copy of Harry Potter and the Sorcerers Stone in something artistic to breath new life to it.

Don't worry, this paperback has been replaced by numerous copies!  Even though it was completely destroyed after nearly 2 decades of love, I was reallllllly hesitant to cut it up at all.

I may have closed my eyes for the first snip.

Using craft glue, Glass ornament balls and snippets of some of my favorite lines, I made Christmas Ornaments that I will treasure forever!

Literary Christmas Ornaments

Supplies:
Glass ornament ball
sponge brush
Mod Podge
book you can sacrifice
scissors
charms/ribbons of your choice for final touches.

First prepare your page pieces. I personally used favorite lines or quotes that mean a lot to me, chapter names, and even pictures on some. Cut pieces and set aside.

Pour Mod Podge into a container for dipping.

Working one strip at a time, brush Mod Podge along the strip while straightening it out on glass ball.

Once all pieces are assembled as desired, do another coat of Mod Podge over entire ornament. For this coat, I used a glossy version.

Once completely dry, add any desired decorations.

I glued a part of the Sorting Hats song to a sturdy gift tag I found, and tied it to the top of the ornament.

“You can keep your bowlers black,
Your top hats sleek and tall,
For I'm the Hogwarts Sorting Hat
And I can cap them all.

There's nothing hidden in your head
The Sorting Hat can't see,
So try me on and I will tell you
Where you ought to be.”

I also had a handful of charms from a bracelet I no longer wore that went great on this!


I can't wait to do this with sad copies of all my favorite books! I scour thrift shops and yard sales for this exact reason now.

What do you do when beloved books are no longer readable?


Monday, May 21, 2018

Lapel Pin Magnets

11 comments:


If you don't have piles of lapel pins floating around your house, do you even Fandom, Bro? 

Between just the two of us, my husband and I have tried about 8-10 different subscription boxes in the last few years, many of which we kept up for many months. Currently we still get about 4 monthly. 


The vast majority of the fandom-themed boxes include a cool new pin in each box. I love them all, but have struggled with how to display them. Up until recently they have sat, stacked up, still in their packaging, in a corner on my shelf near the rest of the displayable parts of my boxes.


Admittedly, this project is not my brainchild. I can't recall where I saw it, whether it be Pinterest of one of my fandom Facebook groups, but many months ago, I saw this incredibly simple yet genius idea to turn these pins into fridge magnets! I've wanted to do it ever since.

Another thing I love to collect is magnets. They're a great way to inexpensively commemorate places visited and hobbies we enjoy. I hate hanging things on my fridge, because to me the magnets themselves are décor. 

I don't keep random advertisement magnets that come in the junk mail. 

I collect magnets from new cities as keepsakes every chance I get! I love looking at them everyday as they remind me of things I love.

I finally got around to ordering magnets for the back. I used these flexible adhesive backed magnets.  I chose them primarily because of the sticky back, but there are some thicker sturdier ones that would require a spot of glue that would be better choices for heavier objects. 

As soon as they arrived, I couldn't wait to make them! 

My husband was a big help as well. Using his Leatherman, he was easily able to snip the safety pin from the back of the button style pins. 

For the lapel pins, he was able to use his pliers to rock the pin back and forth until it snapped off at the base.

For a few of the pins, more than one magnet was needed due to weight. If there isn't enough room to hold more than one without it poking off the edge, you can carefully shave the excess for a nice clean look.

I've had them up on my fridge for about a month now. I noticed on one particularly hot day that they looked like the glue was melty, but none of them came apart. 

I wouldn't be surprised if I have to replace magnets at some point, and that may be the advantage to use higher quality magnets and glue them on yourself.

This project made me so incredibly happy. 

I spent the following days wanting to magnetize anything that wasn't nailed down. 

I'm so excited to get more to do this with - it's given me even more anticipation for each of my incoming subscription boxes! 


Thursday, April 19, 2018

DIY Chalkboard Table

6 comments:

Our kitchen table was given to us shortly after the Mister and I moved into our first apartment by my father. It had been passed around various members of my family for years before even he got it, but for a newlywed couple just starting out, it was perfect.

After a few years, however, I found myself wanting to make it my own.

After some browsing around Pinterest, I decided that a chalkboard table would be the perfect thing for a little family with two young kids!


Actually transforming the table was a lot easier than anticipated!

I went to the hardware store and got some sandpaper and some chalkboard spray paint.

In use as a dining table
Then, one evening after the kids went to bed, I dragged the table out to my carport and started sanding away.

I only did a light scuffing of the varnish, to give the paint something to adhere to.

Thankfully, that was all it needed, and even though it was the part of the job that took the longest, it still didn't take very long at all.

The next part was the most fun, painting!

Even though I was outside I still put on a particle mask and went to town!

I ended up emptying the entire can on the table.

After letting the table dry overnight, I was delighted with the results!

Chalk Octopus!!
I now have a beautiful table that my kids can color on during the dreary wet months of winter in western Washington, and I spent less than $20 to get it!

After a few months of use, I have noticed a few spots where the paint has rubbed or chipped off, but it's really nothing that a bit of touch up chalkboard paint that I got at the craft store can't fix! 


Sunday, October 15, 2017

How to: Half Frankenstein Halloween makeup

20 comments:


Halloween is, oh, only the best holiday ever. It is so great, in fact it is my wedding anniversary.  Happy 10 years, babe! For the first five years of my marriage, I did not get dressed up out of respect for the sacred-ness of getting married on that day. Being the makeup artist I am, I decided 5 years is good, and I started getting dressed up again!

I am also competitive, mainly with myself. So every year I have to out-do myself.

Today, I'm going to show you what I did in 2015 for Halloween. I didn’t take enough pics of what I did for last year's awesomeness, so this is what you get, peeps.

The first thing that I do to plan year after year is search Pinterest, YouTube, and Instagram for spooky inspiration. This process usually takes weeks, and I find a few things I like and will create from a compilation.

While researching for this, I found and fell in love with Lex from Made Yew Look. She is down to earth, a great artist, and is fun to follow. I used much her video, and made some tweaks.


FrankensteinMakeup Tutorial (MadeYewLook)

One of the things I did differently was to use liquid latex to create the center wound.  Lex was able to use a Mehron Special Effects kit which I did not have access to. Instead I went to my local costume shop, Disguise the Limit.

Liquid latex is very similar to lash glue. I found that it is easy to build up, so I was able to make the edges of the wound thinner, and thicker toward the center. In the video, Lex cut the wound open, however with the liquid latex, I found it was easier to create the two sides of the wound separately.

The latex does take quite a while to dry, so ensure you have about 32 years available. (hah!)

I did my eye makeup before hand, but realized later that I could have better used my time creating the wound, then doing the eyes.


I did them smoky with purple, inspired by Lex, and color theory. Purple is a great compliment to the green. Lex used a cooler green than I did, as was the purple, I went with warmer hues to make it a bit more different.

The liquid latex dried a milky clear, and absorbed any color I laid over it very nicely. I used a primer all over first, then mixed a green and white face paint with my regular foundation for a hue of green.

I contoured with green face paint at the hair line, cheek bone and jawline, then set with a translucent powder. I then used a variety of green eyeshadows to create more depth with further contouring. For blush I used a very bright pink just on the apple of my cheek.

As Lex showed, I used a brown eye shadow in the center of the wound before using fake blood, though I decided I should have used more to make the blood darker.

For the stitching, I found the thread I had, even though it was thick, was still too thin. I used a sparing bit of liquid latex as glue to triple and twist the thread. I used a brown eye liner to create the "holes" that the stitching needed.

I made the string too long in my practice round, but loved that as I made faces, and changed expression, it showed that the thread was real stitching, not just drawn on lines.

I used the Liquid latex as glue to attach the thread to my face where the stitches would enter the wound.

I did a basic beauty makeup for the other side, adding a plum color eyeshadow, and blush on the far side of the wound, to create "irritation" to the skin. Add realism.


Taking the wound off was easy an relatively painless. Again, think lash glue. Or Elmer's glue when you were a kid, and had to peal it off. What is super cool, is the stitching came off at the same time.

I am so glad that I practiced before the big night.

I got a better feel for the makeup I don’t use daily, latex, blood, stitching, green all over my face…

I also looked at other Halloween makeup ideas, and decided I wanted more drama with veins.

For the veins, I took a basic triangular sponge, gouged irregular holes in it. I then dipped the sponge in a dark green eyeshadow powder, and sponged the veins in place, never going over the same place twice.

Again, I like the drama, and am competitive, so had to out do my practice round.

This was accomplished with a better executed wound, but then I also extended the center wound down my chest, onto my collar bone, and on my hand.

I used a liquid liner to create cracks coming off the wound, and eye.

I used more brown beneath the blood, and extended the veins onto my chest.

On the Frankenstein side I used dark green to vein, and on the beauty side I used purples, and a deep red color shadow.

I already had purple contacts, and decided again to be like Lex and go with the yellow eye. Everywhere I went, they were out of neon green, my first choice. The result was still awesome though!

I have no idea what I will be doing this year, as usual I will go big, not home.

I still have tons of the liquid latex even after a practice round before the big night, so I plan on using that again. That’s about all I know!


Thursday, September 7, 2017

Budget DIY Decorations for a 1st Birthday

22 comments:


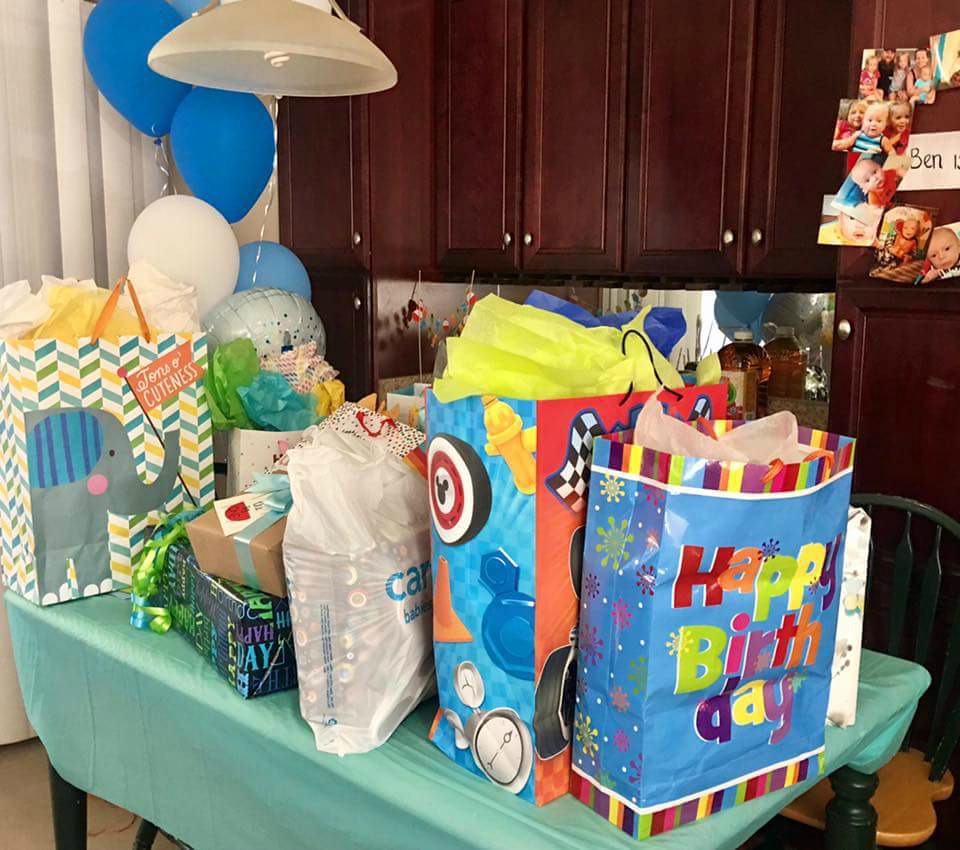
In my family, birthdays are a big deal! We love to celebrate, go all out and have all our family and friends over to make the birthday boy or girl feel as loved as possible.

Now, with three kiddos who all want themed birthdays, it can get pretty expensive! When you think birthday party, there is the food, the decorations, balloons, cakes, etc. All of which, if not done wisely, can cost you an arm and a leg. And that's before you budget in birthday gifts!

I'm here to show you that you can have a fun birthday party on a budget! I spent a total of $24 on decorations for my son's party.

Benjamin is turning 1 years old!! Or, to say it in theme with our party, he's O-FISH-ALLY ONE!!

We are throwing him a little fisherman themed birthday party. As a family, we have made a few camping trips and always go fishing when we do.

Ben has been watching his daddy and uncle fish since about 8 months old. He is always fascinated when he sees them casting and all that, so we thought this type of party would be fitting for him.


I scoured the internet for ideas and decorations through Party City, Target and even Walmart, but everything was so dang expensive! It is a first birthday, one that he will not even remember.

I think that first birthday is more for the family and parents anyway.

In any case, I wanted to have a fun party without breaking our budget, so I decided to Do It Myself! All of it! I made the decorations from scratch, and planned a simple, crowd-friendly menu to go with them.

Now, I am not the most artistic person in the world, so you may be able to paint these items with a little bit better skill but for me, they turned out great and I am so proud of myself!
cr
I started by searching Pinterest for ideas. I saw a bunch of decorations that people have purchased off of Etsy and Amazon type sites.

I looked at them, then looked at the prices and I just couldn't... I mean some of the prices were outrageous and I could easily make them myself with MY own hands.

Well here it is. When you think of fishing, there is the bait, the poles, life jacket (if you're on a boat), tackle boxes, fishing hats, bobbers, etc.

I wanted to make decorations that I could easily string up with some fishing line and hang from my patio outside.

I wanted a few things that I could hang up around my kitchen and living room for when people walked into the house the day of the party.

I had all these ideas and so I just started going for it.

I started with a ton of cardboard boxes that I had lying around the garage. If you don't have some lying around, you can always call your local grocery store or Superstore (Walmart etc) and ask that they hold some boxes for you.

I have never had an issue when doing this and it is usually a cart full or however many you want to take.

FREE! check.

I happened to have a ton of acrylic paint in the garage so I was able to utilize this for my decorations at no extra expense.

If you don't have paint on hand, you can go to the Dollar Store and score some cheap paints!

Remember that this paint doesn't have to be of the highest quality, it is just being used for a ONE DAY PARTY!

You could even use those tempura paints that your kids have sitting in the closet.

I used the paintbrushes from my kids paint set. So for me, FREE! For someone who doesn't have them on hand, maybe $5?

You want to start by taking a pencil and trace out what you want to use as a decoration.

I started with bobbers!

I took the largest bowl I could find in my cupboard and traced it. I then cut it out using a razor knife. I also cut out a little square  that I later used as the top of the bobber.

I made a few of these and set them aside.

Now keep in mind that it is cardboard that you are painting on. It will soak into the box more than you want it to, so you have to do two or three coats when using light colors like white or yellow.

Darker colors seem to work well with just one or two coats depending.

Paint one coat and set it aside.

Don't sit there and hover over it like I did trying to blow it dry (not literally but it sure felt like it).

I made a few other items that were all free hand drawn and cut out by me.

I can say that I did make a few that I was not satisfied with and had to re-do them but it was OK, because I was using cardboard and not an expensive material.

Get creative, you really can go any direction with this step.

What's a first birthday without the adorable month to month pictures of how your little babe has grown over the past 12 months?

Now, this part of the project was probably the most expensive part for me, but it doesn't have to be for you!

I am an avid Shutterfly user and have taken advantage of the 50 prints for free to a new user promo. If you haven't heard of this, please go check it out!  You will receive 50 free prints just for signing up with their website, and they are really good quality! (for you - FREE!)

Since I had taken advantage of this before, I had to get my prints done at my local CVS. It cost me a little under $7 for, I believe, 15 prints. I probably could have found a cheaper rate but I live in a small town and it is easily a half hour drive to get anywhere and, well, 3 kids, hot days, no thanks!

Anyway, I again got my cardboard and created what was intended to depict a life saving flotation device (the rings that they have at pools or sometimes on boats).

I painted it red - which was completely covered by the pictures, so it was kind of a waste of time but oh well.

I carefully arranged my photos from birth to the newest picture I had of little man on there. I then took some tape and made it into double sided tape and stuck them all on there.


I did it this way so that after the party, I could easily take the pictures off and use them again in a frame or baby book!

I thought I was done! Then I started to look at it, and thought it would be cute with a little saying in the middle. I created just a simple rectangle and glued it in. I thought for days of what to write in there and just was not having a creative couple of days so landed on BEN IS ONE.

Short and sweet I suppose! Again, you can get super creative with this.

The one thing that I couldn't figure out how to make myself was the decorations for the cake and cupcakes. I suppose I could have gone without, but the cupcake stakes and bunting I found for the smash cake were adorable and I only spent $11 for both WITH shipping from The Oriental Trading Company.

If you haven't heard of them, I suggest you check them out. They are an awesome site that has just about everything under the sun that would be used for holidays and parties, a lot of which can be bought in bulk for cheap.

The stakes are little poles with a little plastic fish attache, which I used on the cupcakes I made. The bunting went on his little smash cake, and then set aside as a bedroom ornament for his room.


Last but not least, was the tablecloths, silverware, cups and plates, which really aren't decor but I went with a blue and green to match my theme so I will stick in it here as well.

I don't know about you guys, but I am a fan of dollar stores, because if you really take the time to look, you can score some pretty sweet stuff at low cost! Especially if you go at the end of a season or a few weeks after a major holiday, everything is even more discounted!

I scored 24 blue cups ( from 4th of July) for $0.50 for all! I got 2 turquoise table clothes and 2 matching silverware sets for $4. I also grabbed some plastic plates for serving on the discount rack for $0.50 for  24.

At an end-of-summer blow out sale, I found 2 bright green serving platters that I happily grabbed for $1! I will be able to use them again around Halloween or save for next summer.

That is it, $6 for all that! Score!!

Cups and plates will be saved (if not damaged) for our camping box! Can't go wrong with multipurpose items!

So as you can see, it doesn't have to be expensive but can still be awesome and fun!


You can make things with the stuff you have laying around your house and it will even more special because you took the time and effort to make it yourself rather than blindly buying something from a store and as the kids get older they can help make the decorations, too!


Wednesday, July 5, 2017

Altoid Tin Padded Box Topper (Tutorial)

17 comments:

I've been wanting to try my hand at using a repurposed Altoid Tin to make a padded box that could showcase a bit of my needlework for years, and until now, I'd never gotten around to it.

But when I got my June Broderi Box subscription of fibers and other needlework goodies, I knew that a small project using these decadent teals and metallic golds would be just perfect for my first try.

I'm not going to share the chart (at least not today), because I haven't actually charted it out - I worked the stitches as I went, doing no more planning than it took to estimate the size I'd need to cover the box.  If I do get it charted, I will certainly share the graph, though!
:
My piece was 30 x 44 on 28ct fabric over two - and could probably go as large as 34 x 46 without issue.  So if you do this with a needlework decign, keep the stitched area that size or smaller.  That said - you can make a lovely padded box this same way using just a piece of fabric you like.

This is definitely not the only way to go about doing this, and likely not the best way - but it is the way I did it:

Supplies:
Altoids Tin
piece of (stitched) fabric, cut to approx. 4.5" x 6"
Adhesive backed mounting board
Quilt batting
Ribbon or cord
Scissors
Exacto knife

Instructions:
1. Use the Altoid Tin as a template, and trace around it onto the matting board.

2. Use Exacto Knife to cut out the matting board shape.

3. Peel off adhesive backing and mount quilt batting to it.  Use scissors to trim batting so it is the same size and shape as the matting board.

4.  Center fabric over the batting, and fold over edges to the back of it. (use pins if needed to hold it in place.)

5. With thead, attach the fabric to the back by making a series of stitches across and back and forth - there is no specific order to this.  You simply want to create tension and balance until the entire thing is centered and neither too loose or pulled too tightly at the top.

6. Using either a cool heat glue gun or fabric adhesive (a friend recommended E6000 Craft Adhesive to me after I'd used a glue gun and I will follow her advice in the future), cover the back of the padded piece and fix it to the top of the tin, taking care to place it correctly.  Hold it in place for a few minutes (or compress with a flat heavy object, such as a book) to ensure good adhesion.

7. Cut a length of ribbon or cord long enough to go around the edge of the tin lid.  Working an inch or so at a time, glue the ribbon to the tin, placing it high enough to cover the area where the topper meets the tin.  Hold as needed to make sure it attaches solidly.

8. Carefully trim excess ribbon.


That's it!  Now you have a pretty little box that can hold everything from a sewing kit to tea bags to incense to jewelry!

What would you put into your little box of treasure?


Monday, January 16, 2017

Stenciled Affirmations For Self-Care & Relaxation

14 comments:

One of the ways I deal with stress relief is to immerse myself in a bit of crafting therapy.  Just after election day, I was in great need of some focused self-care, and now that we are coming up on the inauguration, looking at my wall art reminds me we are bigger than the outcome of the election.

I mean, everyone who looks at this wall art knows probably what I was aiming for with it and what my views are on the current political situation.

Now, Reviews, Chews & How-Tos is written by a number of people with a variety of political, religious and lifestyle views, so I will not use this post to discuss politics, but I think anyone can relate to sometimes needing visual reminders to keep them going during dark times, regardless of what is causing the darkness for them.

For me, during a year that's been hard in many ways on a personal level, the election's tone of pointless drama, hate and disrespect towards soooo many things that I believe in made it hard, sometimes, to get through the day without feeling anxiety and despair.

I found a personal way to cope with it: Motivational Wall art.

It is easy to feel overwhelmed by the opinions of others, the media, the internet and what-not, but to me it is important that I keep a clear view on what’s important for me and my family. And, personally, I like for other people to see right away what we are about and what we don’t tolerate.

This is how this particular piece of art was born:


I need the people who enter my house and the life of my children to know that hate is not an option here.

And there is just no better way for me to express my love for something other than by creating. I love creating, whether it is an art project, food items or fiber arts. I need to do things that have an end result that I can view and touch and smell (sounds creepy, but hey, at least I am honest! Especially as the mother of young children, you need proof sometimes that you completed something!).

Now, there is more to this though:

I am not a professional in the psychology field, but there are basic techniques that you can do to improve yourself and your mental health. One of them involves focusing on words of affirmation.

What do you think happens almost every time you walk by a positive sign? You may not actively read it but your brain most likely does recognize it. Now imagine reading positive and happy things all day – consciously and subconsciously. It will eventually have an impact on your perspective.

We have motivational Wall Art all over the hous,e and I constantly add more or replace old ones with new ones.

I take my inspirations from many sources but my favorites are from books, songs and movements that I support.

Word Porn (a facebook page), as well as Pinterest are also great sources.

You could do something as simple as jotting motivational words on sticky notes, or print them out and frame them. Since I find artwork to be calming, I made this piece using canvas, paint & stencils.

Here is the how to guide:

You need:

  • Paint
  • Canvas 
  • Paper, the same size as canvas
  • Brushes
  • Stencils (optional)


Once you have the quote or idea you like, sketch it out on some plain paper, the same size of the canvas.

This is a great way to make sure everything will end up centered, or the way you want it. You can also easily change things that way.

Pick your color scheme and start by painting the background for your picture.

With a sharp pencil transfer the sketch from the paper to the canvas. Make sure to only make really fine lines that your paint will be able to cover.

Write your quote on it or paint out the stencils that you choose.

If you have children,I also recommend that you wait until your kids are in bed to do this part or when you have a moment of silence (otherwise all the work you put in to center it may just be a waste of time because your kid may switch out the sketches – this is the reason why mine isn’t centered as I originally planned to do!).

Once it is all done, put it in a safe spot to dry.

What’s your favorite motivational quote? Do you keep it in view to remind yourself of it? Tell me in the comment section!

Tuesday, December 13, 2016

Tutorial: Sew a Huge Wet Bag

8 comments:

Since starting our cloth diapering journey, I have wanted to make a much bigger wet bag then I could find commercially. And with the prices of the medium bags on the market, it's well worth it to make your own. Making your own also means you can select a fabric design that's personal to you!

This project is intermediate - while it isn't difficult, it does involve sewing in a zipper and you will need to understand some basic terms and techniques.

To get started you will need the following:

Sewing Machine
Zipper Foot
¼ Foot or Basic Foot 
Thread
Rotary Cutter
Cutting Mat
22 inch zipper (not a metal)
1 yard Pul Fabric
Clips

No matter where you get your PUL (Polyurethane Laminate, same as cloth diaper water proof fabric), you will want to check for any major flaws. I would hate for you to start sewing, and there is a cut in the middle!

Step 1: CUTTING
Keep your PUL fabric on the fold as it came off the bolt, so that it remains folded in half. Cut the fabric to the length of your zipper - - in this case it will be 22 inches. We will be keeping the width as the width of the fabric (WOF) so less cutting there.

I brought my fabric from Joann’s and it came off the bolt at 32 inches, and 64 when unfolded. So my final cut was 22 by 32 on fold.


Next you will cut your handle part. For this, I keep the PUL folded and measure over 2 ½ inches by the WOF cut off 31 inches from length. Then cut this is half, giving you two pieces with the final cut 2 ½ by 16 ½.

Step 2: SEW THE HANDLES
I like to get the handles out of the way so we will start with that.

(Side Note, make sure your bobbin thread is full) Load your ¼ sewing foot first, I will be using the one with a guide.  (Make sure you set your needle to fall in the middle of the ¼ foot. On my machine, it's 43 Brother)


Fold your handle piece in half, right sides together, sew down both sides using a ¼ seam allowance leaving the two small sides untouched.

Turn right side out. Use a pointer tool (pencil, pen, etc.) to poke out the corners.

Top stitch again using ¼ seam allowance, this time going around the entire handle except the open end. Trim if needed, set aside, repeat for second handle.

Step 3: ZIPPER
 (Switch the zipper foot)

It’s time to clip your zipper onto one layer of the PUL. Make sure that you unfold the fabric so you do not sew through both layers just yet. Start by putting your zipper face down onto the right side of the PUL (print side up).

Using the clips instead of pins help reduce holes in your final project. Begin by sewing your zipper onto the fabric making sure to lift your foot to past the metal handle of the zipper.

Now you will sew the other side of the zipper to the other end.

Place the end of fabric that does not have the zipper face up onto the table. Then pull the zipper end up and face the zipper right side down, making sure that you did not twist the fabric.

You should see the wrong side of the fabric facing you now.

Clip and sew making sure to lift foot to past metal handle. Turn it right side out and topstitch the fabric by the zipper down. This prevents it from coming up and getting caught into the zipper.


Step 4: SEW BAG
Since I want the zipper to be facing me when I’m using it, I will pull the zipper down by 3 inches.

(In the photos I am showing you, the print is side up but you will want to do this with the wrong side facing you.)

To make sure it stays while sewing clip the two layer together. I did not have enough clips so I clipped one side at a time starting with the side of the zipper that has the stopper.


At this time switch to the basic foot and the seam allowance will be ½ inch. Use the markings on your sewing machine to make sure this is correct.

Once this side is sewn make sure to open your zipper most of the way before clipping and sewing the opposite side the same way ½ inch seam allowance. (I recommend going back and forth over the zipper past a few times on both ends)

Step 5: ATTACH HANDLE
Cut corners of the bag at an angle, then reach through the zipper opening to turn right side out.

Now it’s time to attach handle. At the top of the bag, figure out where you would like the handle. I did not measure this part - I just eye balled the center and placed each end of the handle making a 4 inch gap.


Clip and baste with a 1/8 seam allowance.

Turn the bag over and line the other handle up to the one you already basted and repeat.

The final step is to pull up both handles and sew them together with a ¼ seam allowance, I went over this a few times to make it stronger.


Throw the finished bag into the dryer for 5 to 10 mins and you are done and ready to use your new wet bag!

Making your very own wet bag is very rewarding and to customize the size to your needs is even better.


Until next time Sew On, my friends!

Wednesday, October 19, 2016

No-Sew Chunky Crocheted Socks

19 comments:

My sister-in-law recently sent me a picture of some crochet socks that she found on Pinterest and asked me if I could make her some.

I instantly agreed, especially since I was getting really really tired and bored with my current project – a king/queen sized Star Wars C2C blanket that consists of way too much black, white and grey!

I spent the rest of that evening just looking at free and paid patterns and just couldn’t really find the right one and I did not feel like sewing a whole bunch of pieces together.

When it comes to socks I am usually a knitting person, but she definitely wanted the chunky look of crochet, so I just kept trying out different ways and styles until I came up with my own pattern.

After sharing it in one of my favorite Facebook crochet groups, I was so overwhelmed with the responses that I got that I ended up making another pair to double check the pattern to share it with everyone – For Free!

This pattern is made to fit my own shoe size (and my sister in law luckily has the same!!).

Size 6 No Sew Crochet Socks

As with every pattern that I have shared so far, I would like to ask a few things of you.

These are just some basic ethical  standards that I hope people will follow for other crafters who share their work, too:

Don’t tamper with it and then go around claiming it as your own. It’s a bitch move and I am probably in every crochet group that exists and I will find you!

Do not copy and sell this pattern. Just don’t. Don’t be that person. No one likes that kind of people.

Please let others know where you got it from and include a link to this blog when sharing the pattern. Sharing is great! And if you want more free patterns, this is how you get it. Share the blog link and I will find the motivation to type up that huge folder that I have laying right next to me.

What you need:    
  • Yarn
  • Crochet Hook (I used an I hook)
  • Yarn darner
  • Scissors
  • Patience
Start:
>Magic loop with a chain 2 and 10dc                                                                   =11
>Increase every one                                                                                              =22
>18 rounds of dc                                                                                                   =22/each
>18 dc for the next 6 rows                                                                                    =18/each
>1dc, 8 dc decrease, 1 dc                                                                                      =10
>1 dc, 4 dc decrease, 1 dc                                                                                     =6
>join with a slip stitch into the beginning loop of the row                                   = n/a
>chain 2, 1dc in same spot, 7 dc, 2 dc increase, 4dc, 2 dc increase, 7dc, join     =28
>chain 2, 9dc, 1dc increase, 9dc, 1dc increase, 7dc                                             =30
>2 rounds                                                                                                              =30/each
>chain 2, 4dc, 1dc decrease, 20dc, 1dc decrease, 1dc                                          =28
>20 rounds                                                                                                            =28/each
>chain 2, 6dc, 1dc increase, 8dc, 1dc increase, 11dc                                           =30
>3 rounds                                                                                                              =30/each
>chain 2, 7dc, 1dc increase, 11dc, 1dc increase, 9dc                                           =32
>1 round                                                                                                               =32
>chain 2, 8dc, 1dc increase, 13dc, 1dc increase, 8dc                                           =34
>6 rounds                                                                                                              =34/each
>chain 2, 11dc, 1dc decrease, 13dc, 1dc decrease, 4dc                                        =32
>chain 2, 13dc, 1dc decrease, 8dc, 1dc decrease, 6dc                                          =30
>1 round                                                                                                                =30


It is really simple. The decreasing at the heel will form a natural cup like shape for the heel. Then you can just work your way up the leg.


Now, like I mentioned above, this pattern was created to fit my feet, which are a Size 6. If that would be too tight or too loose for your own, you should be able to simply adjust it by starting with more dc or increasing or decreasing more.

Happy Crocheting!


Thursday, October 6, 2016

Unnatural Hair Colors (Does This Pin Even Work?!)

10 comments:

You see them all around the internet, the pictures of people who have dyed their hair an array of beautiful unnatural colors. They grace Facebook, Instagram, and Pinterest day in and day out.
There's peekaboo color, mermaid hair, galaxy hair, fire hair, colored ombre, and the list could go on for the funky color trends that I've seen in the past few years.


But the real question is, can your average human being do this to their hair and have it look good? The answer is yes, but it's not easy.

I am no stranger to dying my hair; I started in fourth grade with chunky auburn low-lights. Since then I have dyed my hair every naturally occurring color, from the blackest black to the whitest blonde, but it wasn't until a few years ago that I took the long desired plunge into unnatural colored dye.

My own hair, dyed cherry red
Over the past few years I have learned a few things about having crazy colored hair.

1. Heat is not your friend!
The first thing I learned is that heat is in no way your friend. While this is true whenever you damage your hair with dye, it is especially true when dealing with rainbow colors.

Not only will you absolutely need to use heat protection when you blow dry/curl/straighten your hair, you also will want to wash it in the coldest water you can tolerate. Washing in hot water will make your colors fade disappointingly quickly. And if you have multiple colors, you will want to wash them separately to prevent the colors from bleeding into one another and creating a muddy icky mess.

2. Wash your hair less often.
I have learned to only wash my hair once a week. Yup, I only let my hair get wet one day a week. Dry shampoo is a staple on those last few days, but because I've been washing my hair only once a week for some time now, my hair is used to it, and I need to use the dry shampoo only if it has been hot and I've been sweating.

My own galaxy inspired hair.
Does that mean I only shower once a week? Nope, I still shower often, but I put my hair up in a shower cap.

Washing your hair as infrequently as possible keeps the colors from fading as quickly.

3. Use conditioning dye in your shampoo and conditioner.
Another way to prevent fading from washing is to put a little bit of conditioning dye in your shampoo and conditioner.  Manic Panic and Punky Color are both good conditioning dyes for this. You could purchase predyed color depositing shampoo and conditioner, but they tend to be expensive and not that great at getting your hair clean.

4. Plan to invest time and money in your hair.
Which brings me to my next point. Having hair that is an unnatural color is an investment of both time and money!

My own hair with a purple ombre.
Should you choose to dye your hair funky colors, you will need to bleach your hair (unless you already have pale blonde hair) before beginning any other coloring. If you were to go to the salon to get this done (which I recommend unless you are 110% confident in your or your friend's bleaching and dying abilities) it could easily cost hundreds of dollars to walk out with colored hair.

And then you have to factor in the cost of the colored shampoo/conditioner and the dry shampoo and shower cap and a swimming cap and it can all add up very quickly.

Should you choose to save a bit of cash and do it yourself at home, you run the risk of really damaging your hair with bleach and not getting the color or effect that you wanted.

5. Explore alternative options to dying.
Has all of this information made you second guess getting wild with your hair? No worries, there are other options for adding a bit of color to your mane without the headache of the upkeep.

My own hair using hair chalk.
If you are looking for a splash of color while not breaking bank, why not use some hair chalk? Fair warning, though, hair chalk may not show up very well on darker hair.

Another great way to add some bright color to your 'do is to get colored extensions. The internet is an awesome place where you can find hair extensions in just about any color you can think of.

This option can get expensive, especially if you want real human hair, but if you are ok with not using heat to style, synthetic hair extensions are an affordable option!

If your extensions are a bit too long for your style, you can always trim them up for a more seamless look.

Finally, if you are looking for color over your whole head, but aren't really up to the commitment of dying, I would really recommend trying out a wig. It's an easy way to try out new colors and cuts while still being able to go back to your normal hair at the end of the day.

Having crazy colors in your hair is a fun way to express yourself, and I really hope that this helps you figure out the best way to go about doing so!

Does this Pin even work? Yes! But with some extra work - if you don't mind that, the results can be well worth it!