Showing posts with label Handmade. Show all posts

Monday, May 28, 2018

Great Honk! It's the Movie Monday Challenge

40 comments:

On the last (or fourth) Monday of each month, a group of bloggers participate in a #MovieMondayChallenge, hosted by C'mon Get Crafty! We decide on a topic, genre, or specific movie to use for inspiration and everyone gets free reign to create something wonderful!
 
This month's challenge was. . . . Fathers! Your Dad's Favorite Film, or just a movie about fatherhood! Everyone was allowed to choose their own favorite film so long as it was inspired by the challenge word.

My father passed away several years ago, and my knowledge of what movies he particularly enjoyed is limited to what he liked before 1980 or so - but the thing he loved was music.  He was career military, but in his heart I believe he wanted to be a musician.

In thinking about that, I was reminded of a movie my husband and I both love (and I'm sure my dad must have, too) - the classic 1962 musical, The Music Man, starring Shirley Jones and Robert Preston.  This is the story of a traveling con artist who comes to small towns, gets them stirred up about creating a boy's band, and sells them the whole package - instruments, uniforms, and music lessons.  One small problem - he doesn't know a thing about music, and strings the wannabe band along with the "Think System" long enough to get the money and leave.

His strategy in each town he goes through is to woo the librarian (as the likely most intelligent person there), create a sense of emergency that a local boy's band would fix ("We got trouble right here in River City!") and flatter everyone else into believing they are talented artistic people whose offspring must surely be musical geniuses.

There are a couple small problems this time - Marian the Librarian is having none of his nonsense, and then he actually falls in love with her, and is touched by her troubled little brother who is blossoming at the idea of being in a band.  Then there is the town council's insistence on seeing his music credentials.  Finally, there is an angry salesman who is tired of him 'skunking the territory' and is intent on seeing him brought to justice.

The characters in this musical are well written exaggerations of small town 'types' and even though it is set around the turn of the 20th century, everyone will recognize the gossipy townswomen, the pragmatic Irish mother of Marian the councilmembers who have been spatting for years, and many others.


My favorites are Mayor Shinn's family - his wife, Eulalie, who regards herself as the natural cultural and social leader of the community and his daughter, Zaneeta who is in love with the town's 'wild kid', Tommy Djilas.

These last two were my inspiration for my project.  

It's become a family joke between my husband and I to exclaim "Ye Gods!" and "Great Honk!", which Zaneeta and Tommy repeat often during the musical.  

Using a book of cross stitch alphabets, I created a pair of pieces highlighting these phrases.

I've had this collection of alphabets on my shelf for twenty years, and selected two fonts that went well together, and selected scraps of white 14ct Aida and a few DMC threads from my stash that coordinated colors that looked like the 'fantasy' band's uniforms.

To center stitched letters, it helps to have either cross stitch graph paper or a cross stitch design app.  How much space to put between each letter and between lines is a matter of eyeballing it to see what looks right, then counting out the width of the letters and the spaces between to get the size of your piece.  I use PCStitch11, but I often revert to graphing on paper when I'm sorting out what I want to do.


Typical for me, I haven't quite finished this project because I didn't fully decide on how I wanted to do it until it was done.  I've ordered a couple of small charms - a pair of drum majorettes to go on each side of Ye Gods, and a trombone to go beneath Great Honk.  I plan to put these into a pair of small deep blue 4x7 frames.

Once I have these completed, I'll post a final picture here!


Now let's see what everyone else was inspired to create for this month's #MovieMondayChallenge!! If you'd like to join our Facebook group, you can request an invite here.

Monday, January 30, 2017

WIPocalypse Check-in: January Progress

3 comments:

At the beginning of the month, I shared my Cross Stitch Goals for 2017, and set my intentions for January, as a part of the WIPocalypse Stitch-A-Long, a monthly gathering of stitchers showing off their monthly progress hosted by Measli's Musings.

I'd deliberately set myself some challenging goals that were within the realm of reason if all went well.... and then got derailed by things going not so well.

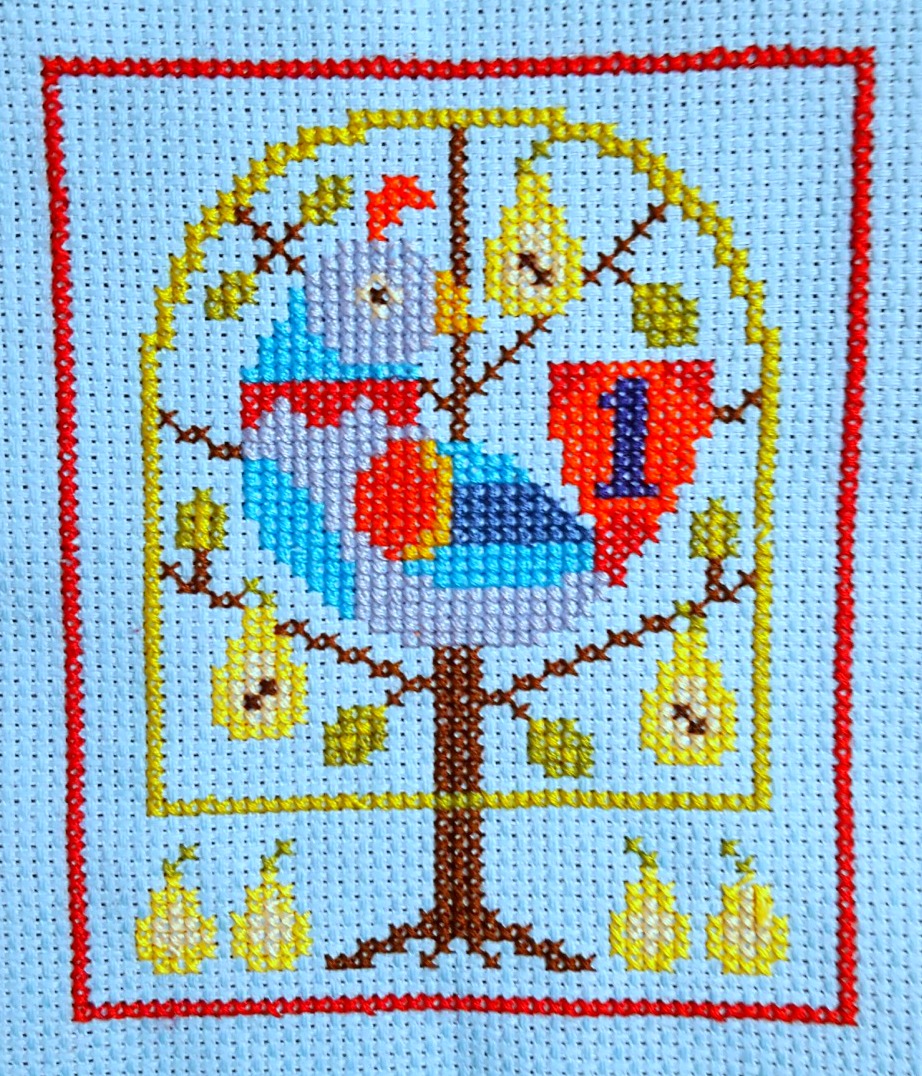
The month started off fine - I began with the first ornament the Satsuma Street 12 Days of Christmas set, and as I noted the other day, got it done on schedule!


Next, I turned my attention to one of my new starts - Mountain Bluebird with Black Currant, by Ajisai Designs.


I made pretty good headway on it for a few days, and then had to move onto something else because that was a whole lot of shades of blue, and I was starting to go cross-eyed! Thi will be added to the WIP (work in progress) pile until the next time it comes up on rotation.


What I didn't realize when I picked up the next item on my list (Ink Circles Metamorphosis) was that I was actually getting sick - I stitched a good way into the medallion on the far left, went to be feeling feverish and woke up to see that not only had I gotten it off by a couple stitches, I'd also apparently been stabbing at random, because many of my stitches weren't even X's!

Argh - so I put it away before I could stand the idea of frogging them all out (it is so much harder with variegated floss, but each X is don't completely, instead of going over a row in one direction, and then back across the whole row.


I was so discouraged, I didn't stitch anything at all for a week!

In the end I got it all frogged out and managed to lay in about half of what I'd taken out.  I'm going to keep working on this in February, because I'd really like to get it done.


Finally, I attempted to work on another small - this one a Halloween ornament - By the Full Moon, also by Ink Circles, originally published in the October 2010 issue of Just Cross Stitch magazine.


Here again, I would have been farther along, except I chose a small bit of yellow silk thread for the moon, and got about half way through it before I realized there was no way I actually had enough for the job.  So, I frogged that back out so I could use a different floss - not only losing the time and effort, but I lost that silk, too.  Disappointing!  I'm going to put this one into the WIP pile for later, too.


For February, my intentions are to continue working on Metamorphosis, to do the 2nd in the Satsuma Street series, to pull out Lizzie*Kate's 100 Years to work on, and to do Primitive Hare's Regency Witch as my Halloween ornament for the month - this piece is a part of the On Wednesdays We Stitch Black SAL Primitive Hare did last year.

Finally, I'm going to turn my attention to some backstitch/blackwork, and tackles Steotch's Needle of Steel.


For this month's WIPocalypse, Melissa asked, "What Stitch-a-Longs (SALs) are you participating in this year?

This is the first time in several years that I've participated in any - I decided to be more orderly (and accountable) about my stitching for 2017, and went looking for some of the old SALs I used to love -and happily, several of them were!

So, in addition to the WIPocalypse SAL on the last Sunday of the month, I'm participating in the TUSAL each month on the New Moon, and the 2017 Smalls SAL on the last Friday of the Month.

I'm also posting on the Halloween Ornies blog and on the Christmas Ornies blog, and plan to participate in a few for the offerings on the Stitch Maynia Facebook group.

There are a few others I am peeking in on, but I'll enjoy them as an observer for this year, and decide what I can reasonably add to my own list for next year.

If you stitch - or just appreciate stitchery - I hope you'll check these SALs and hops out - there's a lot of creative inspiration out there!


Friday, January 27, 2017

Smalls SAL Jan 2017 (& TUSAL Check-In)

6 comments:

This year, I'm really trying to get more organized about my cross stitch goals - my intentions are somewhat aspirational - this month, I'd hoped to get 2 smalls (for me, that's stitchery under about 75 x 75 stitches) down, one Work-in-Progress (WIP) done, and headway made into a larger new start.

Due to a series of mishaps, including illness that must have had me delirious because it led to a lot of 'frogging' of malformed stitches, I completed one small - everything else is still 'in progress', and in some cases are going to take a daunting bit of frogging before I can get back on track.

('frogging' - picking out of stitches because they're in the wrong place or not well stitched. also known as ARGGGHHHHHH!)

Oh, well - more fun for later! hah!

I'll post on the WIPs soon, but meanwhile, this is my check-in with the 2017 Smalls SAL - if you enjoy stitchery, stop over and check out what other small stitchery projects people have gotten finished.


2017 Smalls SAL Jan

This is the one item I finished this month:


Partridge in a Pear Tree by Satsuma Street
Stitched on 14ct Charles Craft Aida Brights: Polar Ice
Used suggested DMC floss colors
63 x 49


I'll be stitching one of these each month, and then finishing them invidually after they're all complete - I'm hoping to turn them into a banner decoration for next Christmas.

TUSAL
Meanwhile, after a few years of not doing it, I'm going to be participating in the oddest little SAL (Stitch-a-Long) there ever was - the New Moon TUSAL.  That translates to Totally Useless Stitch-a-Long, and is just a place to show off ones snippets and scraps (whether you embroider, engage in yarn-arts, or quilt), often referred to as ORTs (Old Ratty Threads).


I keep mine in a little Mason jar - there is also a makeshift wrist pincushion on it for when I need to park a needle for a little while.  Emptied out at the end of the year, here is where it is now after nearly a month.

For me this is a way to remind myself that I have gotten some stitching done and to (theoretically) keep those little snippets from being all over the rug or my chair or my clothes.

Those solid bunches of floss are not a good sign - that's where the stitching went bad and had to be taken back out. Rest in Peace, wasted floss and time.  I hardly knew ye.


Monday, January 16, 2017

Stenciled Affirmations For Self-Care & Relaxation

14 comments:

One of the ways I deal with stress relief is to immerse myself in a bit of crafting therapy.  Just after election day, I was in great need of some focused self-care, and now that we are coming up on the inauguration, looking at my wall art reminds me we are bigger than the outcome of the election.

I mean, everyone who looks at this wall art knows probably what I was aiming for with it and what my views are on the current political situation.

Now, Reviews, Chews & How-Tos is written by a number of people with a variety of political, religious and lifestyle views, so I will not use this post to discuss politics, but I think anyone can relate to sometimes needing visual reminders to keep them going during dark times, regardless of what is causing the darkness for them.

For me, during a year that's been hard in many ways on a personal level, the election's tone of pointless drama, hate and disrespect towards soooo many things that I believe in made it hard, sometimes, to get through the day without feeling anxiety and despair.

I found a personal way to cope with it: Motivational Wall art.

It is easy to feel overwhelmed by the opinions of others, the media, the internet and what-not, but to me it is important that I keep a clear view on what’s important for me and my family. And, personally, I like for other people to see right away what we are about and what we don’t tolerate.

This is how this particular piece of art was born:


I need the people who enter my house and the life of my children to know that hate is not an option here.

And there is just no better way for me to express my love for something other than by creating. I love creating, whether it is an art project, food items or fiber arts. I need to do things that have an end result that I can view and touch and smell (sounds creepy, but hey, at least I am honest! Especially as the mother of young children, you need proof sometimes that you completed something!).

Now, there is more to this though:

I am not a professional in the psychology field, but there are basic techniques that you can do to improve yourself and your mental health. One of them involves focusing on words of affirmation.

What do you think happens almost every time you walk by a positive sign? You may not actively read it but your brain most likely does recognize it. Now imagine reading positive and happy things all day – consciously and subconsciously. It will eventually have an impact on your perspective.

We have motivational Wall Art all over the hous,e and I constantly add more or replace old ones with new ones.

I take my inspirations from many sources but my favorites are from books, songs and movements that I support.

Word Porn (a facebook page), as well as Pinterest are also great sources.

You could do something as simple as jotting motivational words on sticky notes, or print them out and frame them. Since I find artwork to be calming, I made this piece using canvas, paint & stencils.

Here is the how to guide:

You need:

  • Paint
  • Canvas 
  • Paper, the same size as canvas
  • Brushes
  • Stencils (optional)


Once you have the quote or idea you like, sketch it out on some plain paper, the same size of the canvas.

This is a great way to make sure everything will end up centered, or the way you want it. You can also easily change things that way.

Pick your color scheme and start by painting the background for your picture.

With a sharp pencil transfer the sketch from the paper to the canvas. Make sure to only make really fine lines that your paint will be able to cover.

Write your quote on it or paint out the stencils that you choose.

If you have children,I also recommend that you wait until your kids are in bed to do this part or when you have a moment of silence (otherwise all the work you put in to center it may just be a waste of time because your kid may switch out the sketches – this is the reason why mine isn’t centered as I originally planned to do!).

Once it is all done, put it in a safe spot to dry.

What’s your favorite motivational quote? Do you keep it in view to remind yourself of it? Tell me in the comment section!

Monday, January 2, 2017

Stitching Goals for 2017 (WIPocalypse Intro)

12 comments:

Back in 1981, I was 20 years old, in my last month of pregnancy, and very restless.  My best friend bought me a little cross stitch kit - a teddy bear on a rocking horse, and suggested I learn how to cross-stitch, as a way to keep calm while waiting for my first child.

Neither of us knew a thing about it, and that little kit wasn't entirely a beginner project - in addition whole cross stitches, there were both 3/4 and 1/4 stitches, backstitch details, and (ulp) French knots.  But since I didn't know any different, I plugged through it and by the time I finished it just before my daughter was born, I was hooked.

I've been cross-stitching ever since, through the boom era in the 80s and 90s when needlework shops were everywhere, through a few years living in Germany where I tried to figure out differences in style and thread types, and through the growing internet era where there are an abundance of really amazing designers and diverse styles (gone are the days where it seemed everything was geese in blue bows), and a sad parallel lack of local craft shops that dedicate space to cross stitch.

Crafting has trends  and what's in style comes and goes - currently, knitting, crochet and needlepoint are more popular.  But - I have enough stash that even if it became impossible to find new designs, I could still stitch everyday of my life and not get it all done. hah!

One of my goals for this year is to get back to being more organized about my needlework projects. Like most stitchers, I have many WIPs (works-in-progress), many not yet started projects that are calling me, and most formidable of all - a ridiculously large stack of completed stitcheries that need to be finished off in some way, whether it's meant to be framed, or turned into a pillow or an ornament.

I'd really like to have more of my work on display where I can enjoy it, instead of tucked away in a bag to be dealt with 'someday'.  I also am challenged by advanced rheumatoid arthritis, so while I am only occasionally prevented from stitching, I do tend to be a slow stitcher.

So, here's my challenge for the year:

Every month, I want to rotate each week from a new project, a WIP, a Halloween ornament and a Christmas ornament (I'm going to be working on a 12 Days of Christmas set), and plan to get a few items finished for display each month.

These are my planned new non-ornament projects (will this change as we go through the year? Highly likely! New shinies are hard to resist!):


Mountain Bluebird with Black Currant, by Ajisai Designs. (this is one of 3 blue birds and berries designs in this series, which is a blend of cross stitch and blackwork. There are also 3 red birds and berries in a matching series.  I hope to eventually do them all)


Strawberry Fields by Blackbird Designs.   This is one of 6 samplers based on Beatles songs.  I'm totally charmed by them all.


Steotch the Needle of Steel.  A fun and fast bit of blackwork quoting Conan the Barbarian.


Pretty Little DC by SatsumaStreet.  We live in the DC region and I love that this modern take on our town reflects its fun character rather than going ultra-patriotic (we are about much more than our whoever the current crop of politicians are). I love all the cherry blossom trees scattered about.


Poppy Field Biscornu by Nataliya Embroidery.  I adore these sweet little pillows, and like to try to get one done each year.


Turtles All the Way Down by Ink Circles.  Truly one of my favorite designers - she's got a great sense of style along with a quirky sense of humor.


Holiday Magick by Ink Circles. A final fast stitch, this cool Yule charm will close out the year.


Now - will I get through all those? I don't know!  Odds are a few of them will be next year's WIPs!

Meanwhile, these are the WIPs I've chosen to try to get done this year (and leaving the rest of the pile totally alone unless I run out before the year is over):


Metamorphosis by Ink Circles.  This should have been done a year ago - but I lost the baggie containing the Threadworx flosses I was using (not those listed on the chart). I was at a loss as to how to proceed - but a couple weeks ago, I found a note I'd written listing my chosen threads. So, after ordering them online, we're back to the races on this one.


One Hundred Years by Lizzie Kate. SO overdue to get this one done.


ABCs Lessons by Lizzie Kate. I will be glad when this one's done, too.

Once/If I finish these three finished, I'll use my monthy WIP time to try to finish off any of the new starts I haven't gotten done.


 Meanwhile - each month I'll be working on one of SatsumaStreet's 12 Days of Christmas Ornaments - how cute are these??  I got a head start this past week with the first one, although I am using a few brightly colored fabrics on these, rather than all white.  It looks good as a single sampler, too, doesn't it?


My Halloween ornaments, I haven't fully decided on, but for January it will be By the Full Moon, again by Ink Circles.  This was in the October 2010 issue of Just Cross Stitch, and it's been on my list ever since.

So that's it! I'm excited about my plans, and eager to see if I can stick to it.  If you'd like to see what some other stitchers (and quilters and knitters, etc) are planning for the year, stop into the WIPocalypse SAL hosted by measli.com and see what everyone's up to.

We'll be updating on the last Sunday of each month, and I'll let you know how I did.

What crafty goals do you have for this next year? I'll love to hear from you in comments!


Tuesday, December 13, 2016

Tutorial: Sew a Huge Wet Bag

8 comments:

Since starting our cloth diapering journey, I have wanted to make a much bigger wet bag then I could find commercially. And with the prices of the medium bags on the market, it's well worth it to make your own. Making your own also means you can select a fabric design that's personal to you!

This project is intermediate - while it isn't difficult, it does involve sewing in a zipper and you will need to understand some basic terms and techniques.

To get started you will need the following:

Sewing Machine
Zipper Foot
¼ Foot or Basic Foot 
Thread
Rotary Cutter
Cutting Mat
22 inch zipper (not a metal)
1 yard Pul Fabric
Clips

No matter where you get your PUL (Polyurethane Laminate, same as cloth diaper water proof fabric), you will want to check for any major flaws. I would hate for you to start sewing, and there is a cut in the middle!

Step 1: CUTTING
Keep your PUL fabric on the fold as it came off the bolt, so that it remains folded in half. Cut the fabric to the length of your zipper - - in this case it will be 22 inches. We will be keeping the width as the width of the fabric (WOF) so less cutting there.

I brought my fabric from Joann’s and it came off the bolt at 32 inches, and 64 when unfolded. So my final cut was 22 by 32 on fold.


Next you will cut your handle part. For this, I keep the PUL folded and measure over 2 ½ inches by the WOF cut off 31 inches from length. Then cut this is half, giving you two pieces with the final cut 2 ½ by 16 ½.

Step 2: SEW THE HANDLES
I like to get the handles out of the way so we will start with that.

(Side Note, make sure your bobbin thread is full) Load your ¼ sewing foot first, I will be using the one with a guide.  (Make sure you set your needle to fall in the middle of the ¼ foot. On my machine, it's 43 Brother)


Fold your handle piece in half, right sides together, sew down both sides using a ¼ seam allowance leaving the two small sides untouched.

Turn right side out. Use a pointer tool (pencil, pen, etc.) to poke out the corners.

Top stitch again using ¼ seam allowance, this time going around the entire handle except the open end. Trim if needed, set aside, repeat for second handle.

Step 3: ZIPPER
 (Switch the zipper foot)

It’s time to clip your zipper onto one layer of the PUL. Make sure that you unfold the fabric so you do not sew through both layers just yet. Start by putting your zipper face down onto the right side of the PUL (print side up).

Using the clips instead of pins help reduce holes in your final project. Begin by sewing your zipper onto the fabric making sure to lift your foot to past the metal handle of the zipper.

Now you will sew the other side of the zipper to the other end.

Place the end of fabric that does not have the zipper face up onto the table. Then pull the zipper end up and face the zipper right side down, making sure that you did not twist the fabric.

You should see the wrong side of the fabric facing you now.

Clip and sew making sure to lift foot to past metal handle. Turn it right side out and topstitch the fabric by the zipper down. This prevents it from coming up and getting caught into the zipper.


Step 4: SEW BAG
Since I want the zipper to be facing me when I’m using it, I will pull the zipper down by 3 inches.

(In the photos I am showing you, the print is side up but you will want to do this with the wrong side facing you.)

To make sure it stays while sewing clip the two layer together. I did not have enough clips so I clipped one side at a time starting with the side of the zipper that has the stopper.


At this time switch to the basic foot and the seam allowance will be ½ inch. Use the markings on your sewing machine to make sure this is correct.

Once this side is sewn make sure to open your zipper most of the way before clipping and sewing the opposite side the same way ½ inch seam allowance. (I recommend going back and forth over the zipper past a few times on both ends)

Step 5: ATTACH HANDLE
Cut corners of the bag at an angle, then reach through the zipper opening to turn right side out.

Now it’s time to attach handle. At the top of the bag, figure out where you would like the handle. I did not measure this part - I just eye balled the center and placed each end of the handle making a 4 inch gap.


Clip and baste with a 1/8 seam allowance.

Turn the bag over and line the other handle up to the one you already basted and repeat.

The final step is to pull up both handles and sew them together with a ¼ seam allowance, I went over this a few times to make it stronger.


Throw the finished bag into the dryer for 5 to 10 mins and you are done and ready to use your new wet bag!

Making your very own wet bag is very rewarding and to customize the size to your needs is even better.


Until next time Sew On, my friends!