Showing posts with label Recipe. Show all posts

Monday, March 11, 2019

Keftedes (Greek Meatballs) and Tzatziki

18 comments:


Although I visited Greece a few years ago, I mostly enjoyed pasta dishes, so  I never really experienced the unique seasonings that go into Greek style meats. Even still, I have missed the flavors and spices of Greece, and decided to concoct a meal reminiscent of my travels.

You can read all about my trip to Greece here:


This post is about my attempt at Greek style meatballs with tzatziki sauce.

Traditionally these would be made with lamb but I was unable to find that in my area so I settled for a mix of pork and beef with specific seasoning.  In spite of the simplicity of the dish, it reminds me of my time in Santorini.

Greek Meatballs
Serves 4

Ingredients
1 lb ground beef
1 lb ground pork
1 lg red onion grated
3 cloves garlic grated
¼ cup fresh parsley chopped
Juice from one lemon
¼ cup fresh mint
1 egg
¼ cup bread crumbs
Salt
Pepper

Mix all ingredients together, then refrigerate for 2 hours to stiffen (this will help make the meatballs easier to roll and give the flavors time to meld together.
Roll into golf ball size balls.

Cook in pan with olive oil at medium to high heat until crispy outer edge. (You could also bake these, but I prefer the crispier texture of a panfried meatball.)

Serve with Tzatziki for dipping.

Tzatziki
Makes 3 cups

Ingredients
3 cups full fat Greek yogurt
4 garlic cloves minced
1 cup cucumber seeded and grated
1 tbs FRESH dill, chopped
Juice from 1 lemon
1 tbs olive oil
Salt and pepper to taste

Mix all ingredients together and serve or refrigerate for up to 2 days.  This is wonderful as a dip, or drizzled into a pita sandwich.

Eat, while dreaming of  sunny Santorini!


Thursday, February 28, 2019

Crazy Rich Asian Chicken Satay

17 comments:

The February/March reading selection for the Cook the Books Club is Kevin Kwan's Crazy Rich Asians, described by its publishers as "a fun, over-the-top romp through the unbelievable world of the Asian jet set, where anything from this season is already passe and one's pedigree is everything."

That pretty well describes it!  I found it to be a lot of fun and a lot flabbergasting (these are the rich people so rich that the rich people barely know they exist).

Into this world comes the main character, Rachel Chu - a Chinese American academic who discovers (as one does in wealth-fantasy novels) that her unassuming fellow-academic boyfriend just happens to be the son of one of the most crazy-rich families in Singapore.   She finds this out while on a plane to go meet his family and from there, hijinks ensue.

I enjoyed the book a lot and whipped my way through the entire trilogy shortly before the movie came out.  The intrigues and drama are the sort that clearly matter a lot to the characters involved, and for the most part were so far removed from my own life that the whole thing was just fun escapism.

Crazy Rich Asians (the movie) captures a lot of what happens in the book and keeps the frothy tone of it with a few significant modifications.  The biggest one is the way Akwafina's character takes on her sparkling over-the-top-ness, making her quite different from the book version, who is actually one of the most grounded secondary characters involved.

I liked both versions just fine, but don't read the book expecting to see the same character.

By luck, the movie is also this month's Food n' Flix choice, hosted by Eliot Eats (and typical of me, I'm getting this in right under the wire).

Seeing so many of my favorite actors (Constance Wu!  Michelle Yeoh! Lisa Lu!) and enjoying the beautiful sets and fun, not too challenging plot made for a really enjoyable movie night.

The recipe I was inspired to make was chicken satay.  This is what Rachel's boyfriend shares with her when they first land in Singapore, and she's still reeling a bit at the discovery of who he is.

Rather than whisk her off to a fancy restaurant, he takes her down to a popular outdoor street market area, where she meets a few of his friends and they introduce her to the best street food choices in Singapore - especially the Chicken Satay.

Now, I'm not even going  to try to claim mine is as good as theirs was described, but we really enjoyed it!  This version has a spicy peanut sauce to go with it - and I used some extra sauce to mix into some zucchini noodles sprinkled with peanuts.

The recipe I used is based on Milk Street's Singapore Chicken Satay, cooked in the oven rather than a grill.  Other than the time it takes to marinate the chicken, this made for an easy and simple dinner that would also be wonderful as a part of a buffet table.

Chicken Satay
serves 4

2 lbs boneless skinless chicken thighs, cut into 1" wide strips

Marinade
2 Tblsp freshly grated ginger + 2 tsp. (reserve)
6 garlic cloves, finely minced + 1  clove (reserve)
1/4 cup sugar
2 Tblsp oil
1 Tblsp sesame oil
2 Tblsp turmeric powder
1 Tblsp ground cumin
1 Tblsp salt

Peanut Sauce
1/4 cup boiling water
2 Tblsp creamy peanut butter
1/4 cup soy sauce
1/4 cup rice wine vinegar
1 Tblsp sugar
2 Tblsp oil
reserved 2 tsp. grated ginger
reserved clove garlic, minced
2 Tblsp. chile garlic sauce
1/2 tsp. ground turmeric
1/2 cup finely chopped roasted peanuts

Prepare the marinade:
Combine all and stir until sugar is dissolved.  Add chicken and marinade for 2-3 hours in refrigerator. (Don't marinate any longer than that - it will get too salty.)

Prepare the sauce:
In a medium bowl, whisk together peanut butter and boiling water until smooth.  Add soy sauce, rice wine vinegar and sugar, whisking to combine. Set aside.

In a small skillet, heat oil and add ginger and garlic. Cook, stirring constantly, until fragrant (about 1 minute).  Add the chile garlic sauce and turmeric, and cook another 30 seconds, until fragrant.

Whisk the garlic-ginger sauce into the bowl of peanut butter and soy.  Remove 1/4 cup for basting the chicken, and set aside the rest in the refrigerator for serving.  Let come to room temperature about 30 minutes before cooking the chicken, and stir in 1/4 cup of the peanuts.

Prepare the chicken:
Cover a sheet pan with foil or parchment paper, setting a wire rack on top of it.

Drain chicken in a colander in the sink.  Using wooden or metal skewers (I used wood but would have preferred metal), thread 2-3 pieces of the chicken onto the skewers, and set on the rack in the sheet pan.  Continue with remaining chicken, making sure not to crowd them on the rack.

Broil chicken for 5-7 minutes, then flip them and broil another 4-6 minutes.

Brush the chicken with half the sauce reserved for basting, and broil until nicely charred, another 2-4 minutes.  Then flip the chicken and brush with sauce again, then broiling for 2-4 minutes, until well charred.

Serve with peanut sauce.

To serve I made a cold zucchini noodle salad by spiralizing some zucchini and tossing it with part of the peanut sauce and sprinkled with chopped peanuts.  Delicious!


Check out the Food n' Flix Round Up to see the other delicious treats inspired by Crazy Rich Asians!


Thursday, February 14, 2019

Sausage Spaghetti Sauce over Zoodles

10 comments:


While my husband I still enjoy a great pasta dish now and then, we often switch up the pasta itself for spiralized zucchini (zoodles!), not only to reduce the carb load, but because they taste great!  Both of us are 'pasta is the carrier for saucy goodness' people, so this really works for us.

This sauce recipe has been how I do it for years - make up the sauce a couple hours before dinner, zoodle up the zucchini in just a couple minutes and chop up those little zucchini tubes left behind and toss them in the sauce.  The actual labor is minimal, and this sauce freezes beautifully, so this is an excellent weeknight meal.

I like to keep those little four-packs of individual servings of wine in my pantry for cooking - a pack of red and a pack of white gives me just enough to add a bottle to a meal without having to commit to drinking the rest of a full bottle that night.  If you enjoy wine often, boxed wine also let's you draw a bit for cooking without the rest of a bottle going stale.

Heads up - this sauce is flavorful and on the spicy side!  If you prefer a more mild taste, reduce or leave out the red pepper flakes and use sweet Italian sausage in place of the Spicy Italian sausage.


Italian Sausage Spaghetti Sauce over Zoodles
serves 6

1-2 zucchinis per person, spiralized
2 Tblsp. olive oil
1 lb. spicy Italian sausage
1 onion, minced
1 pkg sliced mushrooms
1/3 cup of red wine
1 Tblsp minced garlic
1 can sliced black olives
1 large can fire-roasted tomatoes
1 large can tomato paste
2 cups beef broth
2 Tblsp. Italian seasoning blend
1 tsp. red pepper flakes
Salt and pepper to taste
Parmesan cheese


Remove sausage from casings and brown.  Add onions and mushrooms, and cook until softened.

Add garlic and cook just until fragrant.

Add wine, and cook until wine is reduced.

Add tomatoes, paste, broth, olives and seasonings, stirring to combine and incorporate the paste. Bring to boil, then reduce and simmer on medium low for at least an hour - two if you have the time.

Taste about half way through, and adjust seasonings as needed.  If sauce gets too thick before you're ready for it, add some water or broth and let it continue simmering.

Spiralize the zucchini a few minutes before serving.  Chop the spirals a bit (otherwise, they're one long noodle strand) and divide into dinner bowls. Dice any unused zucchini bits and toss them in a pot - they'll cook in just a few minutes.

Top the zucchini noodles with the sauce - the heat from the sauce will soften the zucchini just slightly, so that they are al dente.

Sprinkle with Parmesan cheese and serve.


I am sharing this with the Improve Cooking Challenge, a fun two-ingredient cooking challenge that posts on the 2nd Thursday of each month.  This month's challenge was Wine & Italian Seasoning.


 Check out what the other bloggers have made!

Improv Cooking Challenge: February 2019

Ingredients: Wine and Italian Seasoning


Lemon Caper Italian Chicken by Cindy's Recipes and Writings
Italian Sausage Marinara with Penne by Jolene's Recipe Journal
Pasta in White Wine Herb Sauce by A Day in the Life on the Farm
Sausage Spaghetti Sauce Over Zoodles by Reviews, Chews & How-Tos


The #ImprovCookingChallenge is a monthly blogging event where two ingredients are assigned to a month. Bloggers can make any recipe they like as long as it features the two ingredients.

If you are a blogger and would like to join us, please visit our Facebook page.You can also read more about the event on our our home page.  If you’d like to see previous creations, check out our Pinterest board.


Monday, February 11, 2019

Salmon in Puff Pastry #BakingBloggers

11 comments:


This month, I am joining several other bloggers at Baking Bloggers to share a dish with this month's theme: British Baking!

My first thought was to try something amazing inspired by the Great British Bake Off, but as much as I enjoy watching the show, I do not make intricate desserts, nor do we eat dessert often enough to go through all that.

Instead, I looked into my Kindle, where I keep a ridiculous number of cookbooks, to see what I might have.  Sure enough, there was an old-fashioned little gem from the Hippocrene Cookbook Collection, entitled The English Country Kitchen, by Geraldine Duncann.

Among the recipes there was one I actually had all the ingredients for, so I decided to give it a try: Salmon in Puff Pastry from Northumberland.  This made for a nice not-too-heavy meal served alongside a salad, and meat wrapped in pastry is a British technique that goes back for centuries.


One note on this - the original recipe very cavalierly mentions removing the skin off the salmon fillets.  I did not find this to be an easy task, and some instruction on just how to go about that would have been good.  

I did not manage it gracefully, so it was a good thing the salmon was going to be hidden inside the puff pastry!

I did crisp up the skins in the microwave for our dog, so she won even if my salmon lost!

Additionally, I included the called for hard-cooked egg slices but honestly, I didn't find that they added much to the taste or texture when we ate them.  I wouldn't bother doing that again if I make this in the future.

Otherwise, I made a few modifications and this recipe is what I did. (sorry, I have no good advice on removing those skins!)

Salmon in Puff Pastry
Serves 2-4

4 Tblsp. English Mustard
1 tsp. nutmeg
salt and pepper
2 tsp. dried dill
4 salmon fillets, skins removed, thawed
1 sheet of puff pastry, thawed but still cold
2 boiled eggs, sliced (optional)
1 egg, beaten

Preheat oven to 350F.

In a small bowl, mix seasonings into mustard. Set aside.

Cut puff pastry into four rectangles, and roll slightly to make them large enough to encase the salmon fillets.

Cover a baking sheet with parchment paper.

Set a fillet in the center of a rectangle. Spread with 1 Tablespoon of the mustard mixture. Set a couple egg slices on top, if using.

Fold the puff pasty over the salmon completely, pinching the edges where they meet  and at each end, sealing well. 

Set on the parchment paper, seam side down. Repeat with the other fillets.

Brush puff pastry top with the egg wash and make slits on top of the pastry.

Bake for 30-40 minutes until the puff pastry is golden brown and flaky.


Take a tour of these other Baking Bloggers sharing their British Baking dishes!

Bread & Butter Pudding by Sneha's Recipe
Chocolate Chip Scones by Jolene's Recipe Journal
Eccles Cakes by Caroline's Cooking
English Granary-Style Bread by Karen's Kitchen Stories
Fat Rascals by Palatable Pastime
Jammie Dodgers by Culinary Adventures with Camilla
Mini Toad in the Hole by Sid's Sea Palm Cooking
Raspberry Bakewell Tarts by Pandemonium Noshery
Salmon in Puff Pastry by Reviews, Chews & How-Tos
Strawberry Almond Crumble by Food Lust People Love
Strawberry Dark Chocolate Shortbread Biscuits by Faith, Hope, Love, & Luck Survive Despite a Whiskered Accomplice
Wizarding World Chocolate Trifle by Simple Inspired Meals


Sunday, February 10, 2019

Cottage Pie with Mashed Cauliflower #eattheworld

16 comments:

This month's Eat the World Challenge is hosted by Evelyn of CulturEatz, and takes us to England!  I'm joining several bloggers as we explore and try recipes from around the world on the 10th of each month.


This month, I'm sharing Cottage Pie - a great, hearty old-fashioned dish  that, like many Americans, I mistakenly called Shepherd's Pie for many years. But Shepherd's Pie is made with lamb or mutton - when it's made with beef, it's Cottage Pie.

I haven't made this in awhile, but when I have, I usually use leftover mashed potatoes. This time around, I decided to make it low-carb and switched it up for mashed cauliflower.  It worked out well and was even better the next day as leftovers!  The next time I do this, I'm going to make up the mashed cauliflower the day before and let it chill overnight to give it some extra time to thicken up.

This can also be made when any leftover vegetables you have on hand.

Cottage Pie with Mashed Cauliflower
serves 4
recipe inspired by Living Chirpy

Filling:
1 lb ground beef
2 Tblsp. Worcestershire Sauce
2 Tblsp. olive oil
2 carrots, peeled and diced
2 celery stalks, diced
1 onion, minced
2 tsp. Italian seasoning
1 14 oz. can diced tomatoes
2 cups beef broth
1 3 oz. can tomato paste
Salt & Pepper to taste

Topping:
1 head of cauliflower, cut into chunks
1/2 stick of butter
2 tsp. garlic powder
Salt & pepper to taste
1/2 cup heavy cream
1/4 cup grated Parmesan
1 cup shredded cheddar cheese

Put cauliflower chunks into the top of a steamer pot over boiling water, and cook until tender (20-30 minutes).

Put steamed cauliflower into a blender, along with butter, garlic, salt, pepper, and cream and whip to a puree.  Fold in half the cheddar, mixing to melt the cheese in the hot cauliflower. Set aside. (Or overnight in the refrigerator).

Brown the ground beef and season with Worcestershire sauce, salt and pepper.  Add oil, onions, carrots and celery, and cook on medium heat until the vegetables are softened.

Add broth, tomatoes, tomato paste and Italian seasoning and simmer for about 45 minutes until vegetables are fully tender and liquid has cooked down and thickened.

Turn meat and vegetable filling into a casserole dish and spread evenly.  Top with the cauliflower mash, and sprinkle remaining cheese over the top.

Bake for 30 minutes, then give it 5 minutes under the broiler until bubbly and slightly browned.

Enjoy!


Check out all the wonderful English dishes prepared by fellow Eat the World members and share with #eattheworld. Click here to find out how to join and have fun exploring a country a month in the kitchen with us!

Simply Inspired Meals: Wizarding World Beef and Guinness Stew 


Friday, January 25, 2019

Instant Pot Chicken Corn Chowder with Bacon

6 comments:

I am going to be honest here - I have had an Instant Pot for two years now, and it still freaks me out.  I have given up trying to sort out exactly why.

To be sure, I find the instructions incomprehensible (although easy once I manage to figure out what I'm being told to do) and the inability to know exactly how long something is going to take really messes with my decades of practice at timing multiple elements of meal. 

There is also a little bit of really lingering ancient fear that came from my mother's hushed assurances that using a pressure cooker would BLOW UP THE HOUSE! (she never crossed paths with an Instant Pot - but her voice still lives in my head.)

My daughter and son in law are geniuses with the thing - so when they were visiting with us, I used the opportunity to make something in it so that if it went tragically wrong, I could blame them get their help fixing it.

I'd had my eye on this recipe for Instant Pot Bacon, Corn, & Potato Chowder from FoodFunFamily for awhile and decided to add some cooked shredded chicken I had on hand, and modified it a bit to our taste.

The result was delicious, filling, and as easy as could be!

I can't say I've defeated my fear of the Instant Pot - but I certainly have found at least one thing I know will come out just right.

I used bacon reserved from breakfast - but you can certainly cook it up in the Instant Pot as your first step, using the saute feature.

Instant Pot Chicken Corn Chowder with Bacon
Serves 4-6

1 lb cooked, shredded chicken
2 Tblsp. bacon grease or 1 Tblsp. coconut oil + 1 Tblsp. butter
1 onion, minced
2 celery stalks, thin sliced
4-5 Yukon Gold Potatoes, diced (peeling optional)
2 bay leaves
16 oz frozen corn kernels
1 tsp. dried thyme
1 tsp. dried parsley
1/2 tsp. dried marjoram
salt and fresh ground black pepper to taste
1 cup whole milk
1/2 cup heavy cream
1 tsp. Cholula or Tapatio hot sauce
1/2 pack bacon, cooked crisp and diced
2 cups shredded sharp Cheddar (optional)

Melt bacon fat or coconut oil in the Instant Pot on Saute.  Cook the onion and celery, stirring occasionally, until soft; about 5 minutes.  

Turn off the Saute feature, add potatoes and bay leaves and let rest a couple of minutes. (This allows a bit of cooling so you don't create a lot of steam when you add the broth.

Add the broth.  Close and lock the lid and seal the valve.  Press MANUAL and and cook 1 minute on HIGH.

Release valve pressure and remove lid once the steam stops.

Discard bay leaves and add chicken, corn, seasonings, milk and cream, and hot sauce.  Press CANCEL, then SAUTE and cook, stirring frequently, until hot - about 5-10 minutes.  Stir in half the diced bacon.

To serve, top with diced bacon and, if desired, shredded sharp cheddar.

This is excellent with biscuits or crusty rolls, but just fine on its own!


Monday, January 14, 2019

Baked Turkey Tetrazzini #BakingBloggers

10 comments:


This month, I am joining several other bloggers at Baking Bloggers to share a Baked Pasta dish.

When I was a kid, my mom would make tetrazzini whenever we had leftover poultry or ham after a holiday feast.  The pasta would vary from spaghetti noodles to flat egg noodles, and the sauce was bolstered by condensed cream of something soups.

Those cans are the biggest reason why I rarely thought of it as an adult cooking to my own case, but of course they are not necessary!  The sauce for this version calls for broth and cream, and plenty of cheese to make it just right for cold winter nights.

Baked Turkey Tetrazzini
Serves 6-8
Preheat oven to 400F.

12 oz. linguine, snapped in half and cooked to al dente

6 T. butter
1 onion, minced
3 garlic cloves, finely minced
8 oz. sliced mushrooms
1/4 cup flour
1 cup chicken or turkey broth
1 cup whole milk
1 cup heavy cream
1/2 cup white wine
1 tsp. salt
1 tsp. pepper
1 tsp. thyme
1/4 tsp. nutmeg
1 lb.  leftover cooked turkey, chopped
1 bag frozen peas
handful fresh parsley, chopped
1 cup grated Parmesan
2 cups shredded Mozzarella

Prepare linguine according to package instructions, taking care not  to overcook.

Have a large bowl on hand and put the shredded poultry there.

Melt 3 T. butter in a large skillet.  Add onion and cook until softened.  Add garlic, cooking until fragrant (be careful not to scorch).  Add mushrooms, salt, pepper and thyme and continue to saute until the mushrooms are softened and cooked.

Remove onion and mushroom mixture to the bowl of turkey and set aside.

Add wine to the pan and scrap to get any cooked bits loosened from the bottom. Simmer until nearly evaporated.

Add 3 T. butter to pan and melt at medium low.  Add flour and cook, stirring, for two minutes.   Add milk, cream, broth and nutmeg and raise heat to boil. Cook, stirring, until the sauce begins to thicken, about 10 minutes.

Cook peas in microwave.

Add the turkey and mushroom mixture, the peas and the pasta in the pan, and stir in the Parmesan cheese, mixing to combine all and thoroughly coating the pasta with sauce.

Turn this mixture into a greased baking dish.  Top with shredded mozzarella . Bake, uncovered, at 400F for 30-40 minutes.

Let settle for about 10 minutes after you remove this from the oven.


Check out these other delicious baked pasta dishes!

Baking Bloggers

Baked Pasta


Thursday, January 10, 2019

Tikel Gomen - Ethiopian Cabbage & Potatoes #eattheworld

27 comments:

On the 10th of each month, Cultureatz hosts the Eat the World Challenge, selecting one country each month to feature and share recipes from that country.  The first up for 2019 is Ethiopia!

Here in the DC area, we are fortunate to have several excellent Ethiopian restaurants where you can find Injera bread and a multitude of dishes brought out on a large communal platter to share, so while I always enjoy going out for Ethiopian food, I've never tried making any.

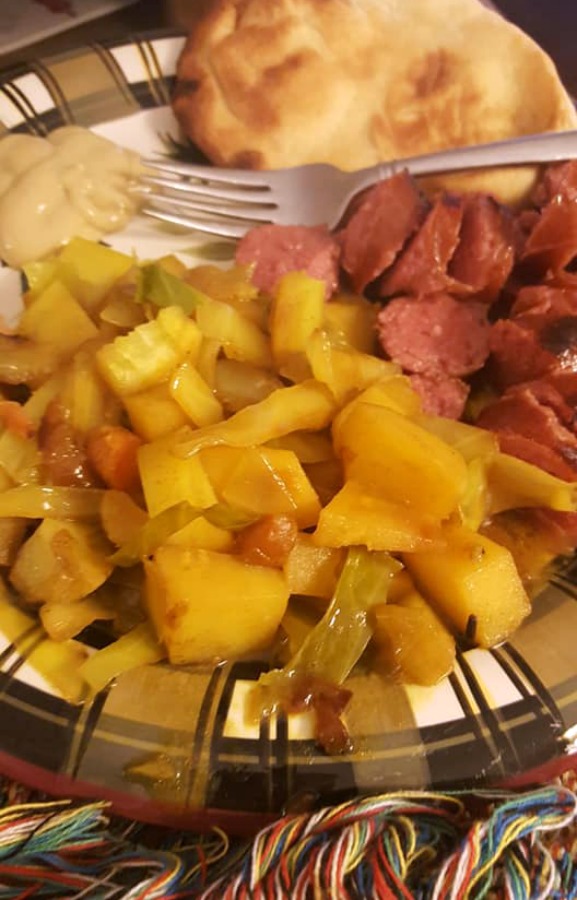
For my first try, then, I went for something simple and one of my favorites - Tikel Gomen, a cabbage, potato and carrot dish that is flavorful and savory.

This works as a meatless entree or a side and not only as part of an Ethiopian spread.

Tikel Gomen (Ethiopian Cabbage & Potatoes
Serves 4-6

1/4 cup olive oil
1/4 cup ghee, butter or coconut oil
4 carrots, sliced thin
1 onion, minced
1/2 head green cabbage, thinly sliced
5 Yukon potatoes, cubed
1 tsp. sea salt
1 tsp. coarse ground black pepper
1 tsp. cumin
1/2 tsp. cayenne
1 cup chicken or vegetable broth

Heat the olive and coconut oil in a stock pot, add carrots and onion and cook on medium until softened.

Stir in seasonings and cook for a minute until fragrant, then add the cabbage and cook another 20 minutes.  Taste for seasoning adjustments.

Add potatoes and broth, and bring to boil.  Lower to medium high and cover, letting simmer another half hour until potatoes are tender and the broth has cooked down.

Serve on the side with additional Ethiopian dishes, or with any other meat desired.

If you have access to Injera bread (a Teff-based porous sourdough flatbread), use bits of the Injera to scoop up the Tiki Gomen.

Enjoy!


Check out all the wonderful Ethiopian dishes prepared by fellow Eat the World members and share with #eattheworld.

Click here to find out how to join and have fun exploring a country a month in the kitchen with us! Next month is ENGLAND!


Saturday, January 5, 2019

Cave Tools Marinade Meat Injector Kit (Review)

4 comments:


The first time I ever saw anyone inject a large cut of meat prior to cooking was at a summer cookout, where they were injecting, of all things, a giant turkey with barbecue sauce before letting it roast outside.   When I ate it, the experience was amazing - smoked meat with veins of barbecue sauce running through the meat, it was fall off the bone tender and flavorful in a way I'd never have thought possible for turkey.

Now, I've never done that - but it remains one of those shining food memories I still think about 25 years later.

I recently received the Cave Tools Marinade Meat Injector for review, and immediately thought about that turkey, so I knew what a difference injecting meats with flavor and fat can be.  I wasn't ready to try this on a turkey (although I definitely plan to with a turkey breast fairly soon), but I did have a nice beef tritips I wanted to do something interesting with.

Before I get to that, I want to tell you a bit about the Cave Tools Meat Injector. 


  • First of all, it is stainless steel.  I have seen and rejected buying injectors due to plastic parts that I was pretty sure would break when faced with the task of injecting into meat.
  • The area where your liquid goes is clear, sturdy plastic providing a window so that you can see how much marinade you have left.  Really important!
  • It comes with three needle tips, so it handles a multitude of needs, from a small one, to one that has multiple holes (for more liquidy insertions), and a wide mouthed ones for thicker sauces - or even for dessert making when you want to fill a doughnut or eclair!
  • The injector comes in a box with padded spaces for each part so that it stores neatly and safely until its next use. 
  • It breaks down completely into individual parts that are dishwasher-safe, and comes with extra o-rings in case of loss.
The directions ask that you oil (with food grade oil) the relevant parts prior to use, and I found that to be vital to using it easily - it creates a tight seal and suction that doesn't leak at all, but that did mean I had to work at it to get my marinade to inject into the meat.  

That was the only problem I had with it, and it had everything to do with my own inexperience with the process.  The second time I used it I had no issues at all.   

I wouldn't change a thing about this tool, and I now find myself actively seeking out ways to incorporate it into my meal preparation.  

Just know that you might have a short learning curve while you get a feel for it, and maybe experiment a bit with which needle best does what you're trying to do.

While I didn't want to risk my holiday turkey (which we didn't make until New Year's) trying to inject a marinade, I found the Cave Tools Marinade Meat Injector to be perfect for slipping some butter under the skin without needing to handle the bird too much, and I plan to do the same for skin on chicken and other smaller cuts as well.

Here's a recipe to get you started using the Cave Tools Marinade Meat Injector.  When you purchase, you'll also get a link to an ebook filled with more recipes that use Cave Tools products.

The bourbon provided an interesting and different flavor note to the meat that was a little earthy, a little spicy - however this is very versatile.  Feel free to swap it for wine, beer, brewed coffee or broth.  Each of these would provide interesting flavor notes to the meat!


Bourbon Butter Injected Tritip Beef
Serves 4

1 3 lb tritips beef roast

Injected Marinade:
2 Tblsp bourbon
2 Tblsp melted butter
1 Tblsp ground black pepper
1 tsp. 5 Spice Powder 

1 clove garlic, slivered (optional)
Rub:
1 Tblsp sea salt
1 Tblsp coarsely ground pepper
1 tsp garlic powder

Olive oil

Remove meat from refrigerator a half hour before preparing and let rest.

Melt butter in a glass measuring cup in the microwave.  While warm, combine remaining marinade ingredients and whisk to combine.

Using large Cave Tools Meat Injector needle, draw marinade up into the injector,and inject in multiple places into your meat.  If desired, plug the holes left by the needle with slivered garlic.

Pat the meat generously on all sides with the rub and let rest while the oven preheats to 425F.

Using an oven safe large skillet (I like cast iron), sear the meat in olive oil on all sides.

Once browned, move skillet to the oven and roast 10-15 minutes per pound (at medium rare, an instant read thermometer will show 135F).  Remove from heat, tent with foil, and let rest 10-15 minutes before slicing.

We had this the first night sliced with a large salad.  The next night, I combined sliced leftover meat with a can of diced fire roasted tomatoes and green chiles to make a sort of swiss steak dish I served with noodles and roasted broccoli.


The Cave Tools Marinade Meat Injector Kit can be purchased on Amazon or directly from the Cave Tools website for $21.99.  If you use  the code Injector15 you'll get 15% off that price.

If you'd like, check out our previous Cave Tools reviews!


Wednesday, December 19, 2018

ChoriPollo (Chorizo & Chicken with Queso)

6 comments:


I can't recall for sure where I first had this dish, but I think it was at Los Domingos in Barstow California about five years ago. We then moved to Germany for the last three years, and sadly, there was NO decent Mexican food anywhere around.

I have now been back in America for about a month and a half and I have already devoured this twice at what is quickly becoming a local favorite spot.

Last night, while looking at the wonderful Latin-American staples I had stocked our new fridge with - all things I've missed terribly over the last few years - I realized I had everything I needed to attempt ChoriPollo at home!

It turns out that this dish is very easy for the home cook to make - and it only takes four ingredients plus seasoning!

ChoriPollo
Serves 6

Ingredients
Boneless Skinless Chicken breasts (I used about 8 tenderloins)
salt, pepper, garlic powder, to taste
1lb Pork Chorizo (Cacique is my favorite brand)
1 cup shredded/chunked Oaxaca cheese *
1 cup shredded/chunked Queso Fresca *

*use more or less of either cheese for desired goopiness. Oaxaca stays pretty goopy like mozarrella, while Queso Fresca gives you a more liquidy cheese experience with curds.

Instructions
Liberally season chicken with salt, pepper and garlic powder.

Cook chicken however you please - once cooked, it will be chopped or shredded. I use my Instant pot by pouring in one cup of water, and laying thawed chicken on a trivet above the water. Cook on High for 12 minutes, quick release steam. Remove chicken and set aside.

Slit open the tube of chorizo, and place loose meat in a skillet. (You don't need to add extra fat, as there will be plenty. Cook chorizo, stirring frequently, until fully cooked.  The meat is seasoned with red spices, so keep an eye for the chorizo to be fully browned, but be aware that it will continue to have a red hue and be very wet,like a meat sauce.

After slicing, shredding, or pulling apart chunks of the chicken, layer chicken in a casserole dish.

Add cooked chorizo to chicken and mix to coat.

Cover the top of the casserole dish completely in cheeses.

Bake in a 375° oven for 15 minutes, until heated through and the cheese is melted.

Stir the melted cheese into the chicken mixture and bake for an additional 15 minutes or until cheese is fully melted.

Let sit for about five minutes after removing from oven.

Enjoy with sides of your choice and warmed tortillas!  Refried beans, Mexican rice and some guacamole would make this a classic restaurant style combo plate.