Showing posts with label Adrenne Davis. Show all posts

Friday, November 17, 2017

Max On Snax Subscription Box (Review/Giveaway)

28 comments:

A while ago I decided to home-school my 6 year old son and finding things to add in his curriculum that would be educational but also fun and hands on can sometime be a challenge.

I love the idea of getting monthly boxes that will help take some of the prep work off my hands, so having the opportunity to check out Max on Snax made both my son and I very happy.

This program gives my son a fun and awesome way to learn how to prepare healthy snacks and recipes. Max on Snax is also helpful to mothers and daddies alike to teach the value and benefits of eating a more healthy lifestyle.

This was a great way to get my six year old excited about working in the kitchen and making healthy snacks vs fruit gummy snacks.

For this review I received the Starter Kit ($25.00 value) and the Garden Pack ($25.00 value)

The Snax Maker Pack (which should always be the first box received on a new subscription) includes:

A Snax Hat
A Snax-maker Apron
A Sandwich Shaper
4 weekly Charts
Membership Card
Salad Recipe
Big People pack with stickers

My son loved wearing his apron and hat and even insisted on wearing it each and every time he was allowed to be our little chef.


The First thing he made was scrabble eggs for breakfast and he even named himself Chef Deiondre.

The Sandwich Shaper was fun to use, though I found myself having to eat a lot of the leftovers through out the week win-win since he always wanted to make sandwiches and experiment with how much he could put into a sandwich and cut with the shaper.


The salad recipe included was not to our personal liking, but we did manage to eat some of the ingredients on different days. So in place of that, we made a veggie side salad with our dinners on some nights.

The Garden Fun Box includes:
Butterfly Activity
Patch for Apron (Carrot)
Coloring Book
4 weekly charts
Membership card
Big People pack with stickers
Garden Game
Garden Pail
Butterfly Sandwich Shaper
Garden Snax Recipe
Basil Seed

This is the box where I fell in love with Max on Snax. I was able to break this up into a week's worth of assignments dealing with healthy eating and how to grow things that are healthy for you.
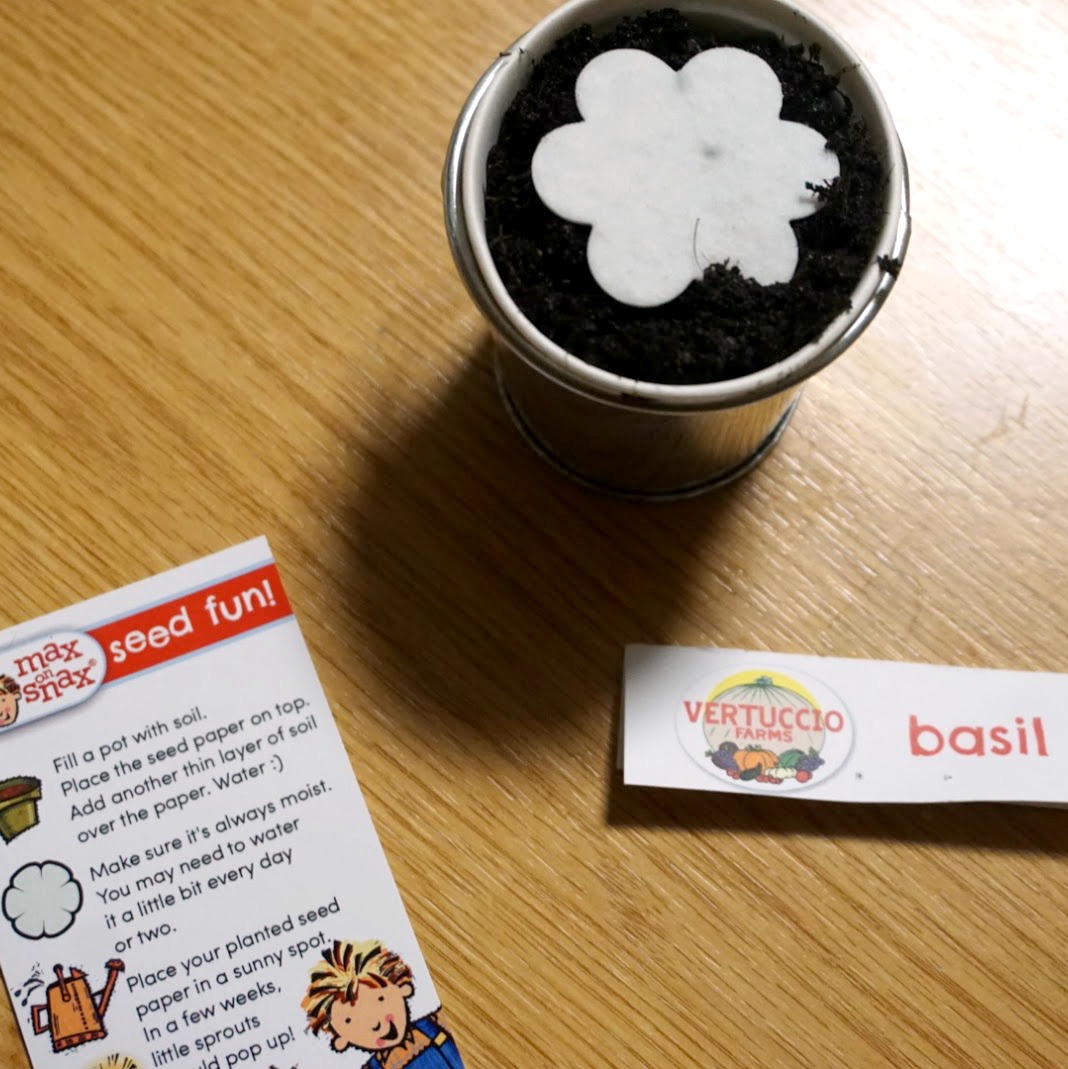
As I also love to grow our own herbs and veggies, I was pleased to see a basil Seed packet inside of the box.

Regrettably it did not take. I blame the very changeable weather in Germany, but my son loved adding his very own seed to our garden window.

He decided to use the Garden pail to store his starter seed and though it was a fail this time we did buy more seeds to try again.

(This is, after all, one of the lessons of gardening.)

The coloring book gave him a great chance to keep busy for our shopping trips, as I had him color each vegetable he saw in the book the same color he saw in the store.

Doing so made him aware of the correct colors some veggies can be so each time he had to color a picture with these vegetables he would color them correctly.


And after he colored and had eaten each of the vegetables in his coloring book, he earned the Master of the Veggies patch included in the box. We decided to sew on his Carrot Patch to his apron. Though you can easily iron on the patch I wanted to sew it down to insure it stays put when the apron was washed.


 Next was the butterfly activity and this activity was fun for him to do and work on his cutting skills, it was easy for him to follow along and do solo. I used this as an art assignment and he enjoyed being able to hang it in the curtains as if they are about to land on some of our plants.


Another favorite of mine was the weekly charts, tracking our eating habits. For this family, the first week was an eye opener to just how much we are lacking of the recommended food groups.

Over the course of a month it became a challenge we all seemed to want to conquer and
fill the chart up each week.

We used a dry eraser marker so we could reuse them. The charts also have an exercise reminder at the bottom, and that too became something my son wanted to make sure he was able to check off.

Apply this to our everyday life and it's now to the point where my son can go to the kitchen and decide on what he will have for lunch or for a snack depending on what he was missing on his chart.

Plus, with the award of having some of his favorite sweet awards at the end of the week for additional motivation.

Last, but one of my son's favorites is the Garden Game.

In the beginning, we would play this game after dinner and he really enjoyed watching his mother skip around the room.

Though I would add, the game is much better with more then two people playing, but over all anything that gets our children excited about eating healthier and learning better eating habits is a win for us all.


The Max on Snax boxes are a for sure win in our household and when you give it a try, you will love it as well. And I can truly speak for everyone here in our household that we can not wait to receive our next box.

Max on Snax kits are available as one-time purchases with a variety of themes for $25 each, or as a monthly subscription for $25 per month. If you buy a kit as a one-time thing, I recommend buying the starter kit along with another box so you can have more activities to do.

The current seasonally themed box is the FALL Box, and Max on Snax is letting us host a Giveaway! One of our readers in the US (including APO addresses) will receive this box chock full of seasonal learning and fun!


To see how you can enter to win, read on!


www.mymaxpack.com
www.facebook.com/maxonsnax
www.pinterest.com/maxonsnax


One winner in the US (including APO/FPO Addresses) will receive the Max on Snax Fall Box, valued at $25.

To enter the giveaway, please leave a comment in this entry as instructed by the Giveaway Tools Entry Form below. This will open up additional optional entries to increase your odds of winning. (If you don't leave a comment, any additional entries will be void.)

This giveaway is open to US RESIDENTS (INCLUDING APO/FPO) ONLY and will end just before midnight ET on 12/1. 

The winner(s) will be notified by email 24 to 48 hours after the end of the giveaway by email. In order to claim the giveaway prize, the winner will need to respond within 24 hours of notification, or an alternate winner will be selected.

Good luck!


Friday, August 18, 2017

Caring for Natural Hair with Hot Head (Giveaway)

48 comments:


For the last several weeks, I've been working with the Hot Head Thermal Hair Care Deep Conditioning Cap for review.  This product is intended to work with a variety of hair types and lengths, but I will be talking about how it handles my natural hair.

After going natural three years ago, I have found the love of my curls and the diversity in the different hairstyles I can do. Going from a big chop to neck length in three years for me is AMAZING!

With that being said, holy moly, it's a work-out to detangle, comb and even work with on a daily basis.


And those visits to the salon for a deep conditioning add up. With young children to look after, I honestly needed a lifesaver before I gave in to the relaxer.

Then I learned about Hot Head, a flax-filled microwavable cap meant to be used with conditioning products to hold in the heat while they work. To be honest, at first I didn't think a cap could actually make my hair feel softer unless I was under a dryer at the salon spending $75 each time. (Yes, it's really 75 bucks where I live.)

At that price, you can understand why I don't go as often as I need to and because it's so time consuming to do it myself, I often just wear this night cap turned daily life cap.

Yes, it is a hot mess and my husband often threatens to throw it away!

So, when I knew I'd be reviewing Hot Head, I didn't have a lot of hope that it'd do any better, but I headed off to the salon for a deep conditioner and a trim so my hair would start in good shape.

(Ok, I wanted an excuse to go, so on paper I will say I went for the sake of the review.)

It was a sorry-not-sorry moment and loved the fact I didn't have to do it myself.

My hair came out soft and smooth and I even had it straightened so it felt weightless. Sadly I do not have a picture for that, because as soon as I walked out the salon doors, I was greeted with nonstop rain that I did not expect, so my hair was poofy before I even got home. (Tear!)

So when the Hot Head arrived, I was actually excited to use it since it was two weeks after the salon waste of time trip.

I ordered the Forbidden Hot Head with skulls on it and it's a beautiful bright red terry on the inside and roses on the top. I LOVE THE FABRIC!!!


The Hot Head cap is reversible and reusable (my two favorite words!), and it also comes with 10 disposable shower caps that are used with it, so not to get product on the cap. This is a good thing, since it is recommended to only wipe clean and use a lint roller on cap.

The first time I used it, I needed to wash out the product in my hair, so I shampooed and conditioned and left the conditioner in my hair to use the Hot Head.

I following the instructions for the first time, and without extending the recommended time.

I found the heat to be OK and the results for my hair to be better then not having it on, but I didn't think the results were an equal replacement to the salon visit.

Now I think this was due to the amount of time I used it for. Per the instructions, I used it for 20 minutes. After that I rinsed and styled with the flaxseed gel and styled with a wash and go method.

The second time I used the cap, I increased the heating time to an extra 20 seconds in the microwave.

I did a co-wash and then applied conditioner and left the cap on for 30 mins. Then I rinsed and blow dried my hair, and rocked the fro for a few days.

During this time I also did a twist out for about 2 days, and it was time to wash again. The results for this was a little better. After taking the cap off and before washing, my hair was soft and had slip to it but after drying it there was no difference for me then without using it.


Now, the next time, I wanted to see the difference in using some of my homemade products, so I used a homemade shampoo with apple cider to clean the scalp and I then used some Shea butter and olive oil with egg conditioner and protein, then put the cap on.

Using two plastic caps and the Hot Head, I heated the cap for an additional 40 seconds past the instructions and left the cap on for 45 mins.

LADIES AND GENTS MY HAIR IS SO FREAKING SOFT!

I literally had to call everyone I knew in my family that was having trouble with their hair about this product.

It did an even better job than the salon using this method. It was soft for the entire eight days I had my twist out, and it heated my hair up to the point I felt my scalp breathing, so it enabled me to have a great scalp massage and release my natural oils.


Plus it allowed all the product to reach every curl - I sometime get a rough patch in the middle of my head as if it didn't get treated, but this did not happen this time.

Even after drying my hair, my edges were like the rest of my hair. It sometimes seem rough and crispy, it that makes sense, but the Hot Head took care of that problem.

So, this product gets 5 stars from me!  I will for sure be getting the Little Hot Head for my daughter, to make working with her hair easier, too.

Of course every head is different, and each time you will have to increase or decrease the heating time and time wearing the Hot Head to your liking. The results varied for me, but once I found the best method for my head I can happily say that $75 bucks will be spent elsewhere. At $29.99 for a reusable Hot Head deep conditioning cap, this is a steal!

I did not try their other products like the spritzers intended to add an aromatherapy element to the experience and to keep the cap moistened, but I do look forward to trying those as well for both me and my daughter.

Hot Head is letting one of our US readers claim a Hot Head Thermal Hair Care Cap for their own - read on to see how you can enter to win.


One winner in the US will receive a Hot Head Thermal Hair Care Deep Condition Cap in the style of their choice, selected from what is in stock at the close of the giveaway.

To enter the giveaway, please leave a comment in this entry as instructed by the Giveaway Tools Entry Form below. This will open up additional optional entries to increase your odds of winning. (If you don't leave a comment, any additional entries will be void.)

This giveaway is open to US RESIDENTS ONLY and will end just before midnight ET on 9/2. 

The winners will be notified by email 24 to 48 hours after the end of the giveaway by email. In order to claim the giveaway prize, the winner will need to respond within 24 hours of notification, or an alternate winner will be selected.

Good luck!

Saturday, April 8, 2017

Review: Zizo Bolt Cover Phone Case

60 comments:


I am a proud owner of a Samsung S7 Edge but I was a little upset when I bought it to hear that this phone had no tough case that I could buy. So when the opportunity to review the Zizo Bolt Cover phone case came along I was excited! I have two kiddos that love my phone and also love, almost need, to drop it and hear me scream in horror thinking they broke it.


When the Zizo Bolt Cover military grade ULTIMATE PROTECTION finally came, I put it on my phone and was so confident in it that I couldn’t wait to give my phone to my 7 month old and say DO YOUR WORST!. And believe me, she did - but failed.

Oh wait let me back up…

First things first, when opening the box you will get a instruction (in 3 different languages)  for applying the Tempered Glass Screen. Now right away I was excited for that because not only would it protect my screen from the messy fingerprints but also the dirt, and helps protect the phone when it falls.


Also included is a belt clip and the lanyard. I only used the lanyard a few times because honestly I don’t like having my phone on it, though it came in handy when my daughter almost threw my phone over a railing. So thumbs up on that, but I didn’t use it much otherwise.

Next the kickstand, which would be a LIFESAVER IN CARS!!!! I use this stand to place my phone in an upright position so I can use Google Maps to find my way around Germany where we live, and for me I MUST HAVE GPS ALL THE TIME.

The kickstand is also perfect for allowing my son to watch Netflix at a safe distance away from the danger of spills. LOVE IT!

Following the picture instructions were so easy and honestly only 4 steps and you are ready to use your phone.

So my first impressions were nothing but positive. Then Day 2 happened.

I decided to test the Zizo's durability claims out by putting my phone through the sort of challenges that are typical in my life.

First, I started by going through a few test runs, using the belt clip as I ran downstairs. Perfect.

I am 5’5 and I held the phone above my head and dropped it. Perfect.

I dropped it with a little throw as I sometimes throw it on the bed and it bounces off and lands on the floor…..(Yes I’m that mom) Perfect

Gave it to my 7 month old with the Hulk's strength for breaking things. Perfect.

Then I put in my bag to get ready to leave, and I didn’t put on the second strap of my bag and the phone and my wallet fall out and Zizo's tempered glass protection screen broke.

Really, not even half my height and it broke? It can be thrown, dropped from above my head, go through my daughter’s drop test and it breaks with that?

I was heartbroken and mad!! WHAT JUST HAPPENED! NOOOOOOOO!

Unfortunately, as I continued to use it, minus the broken screen protector, I found other issues as well.

The very first time I was trying to lift the kickstand, it was stuck so I had to use a butter knife to pry it open. Also, when you do have the “fragile” tempered glass on it, sometimes it doesn’t allow you to click on things as if not recognizing your finger. And trying to raise or lower the volume needs a little muscle just to push it down.


So though I really liked the style of the case, and loved its features in theory, I would not buy this item unless they came up with a tougher screen protecting glass that also would allow you to answer the phone without needing to slide right 10 times.

Now with that being said, I may still use the kickstand part of the case but the fear of it dropping will still be there. The back part of the case really is ruggedized, so I will just hope it lands on that side.

 Whenever I do find my perfect phone case, I will make sure it has a kickstand feature - that is still my favorite part.


One final comment, regarding Zizo's customer service. The day the screen protection cracked (March 9th), I sent them over an email to let them know what happen in hopes to hear back. A month has gone by and still no word back from them. Which is not a great sign in the hopes of getting it fixed or being sent a replacement.

The set I received, including holster and glass screen protector is currently on sale on their website for $23.99.  They also have other styles with built in kickstands that are available without the screen protector.


Tuesday, December 13, 2016

Tutorial: Sew a Huge Wet Bag

8 comments:

Since starting our cloth diapering journey, I have wanted to make a much bigger wet bag then I could find commercially. And with the prices of the medium bags on the market, it's well worth it to make your own. Making your own also means you can select a fabric design that's personal to you!

This project is intermediate - while it isn't difficult, it does involve sewing in a zipper and you will need to understand some basic terms and techniques.

To get started you will need the following:

Sewing Machine
Zipper Foot
¼ Foot or Basic Foot 
Thread
Rotary Cutter
Cutting Mat
22 inch zipper (not a metal)
1 yard Pul Fabric
Clips

No matter where you get your PUL (Polyurethane Laminate, same as cloth diaper water proof fabric), you will want to check for any major flaws. I would hate for you to start sewing, and there is a cut in the middle!

Step 1: CUTTING
Keep your PUL fabric on the fold as it came off the bolt, so that it remains folded in half. Cut the fabric to the length of your zipper - - in this case it will be 22 inches. We will be keeping the width as the width of the fabric (WOF) so less cutting there.

I brought my fabric from Joann’s and it came off the bolt at 32 inches, and 64 when unfolded. So my final cut was 22 by 32 on fold.


Next you will cut your handle part. For this, I keep the PUL folded and measure over 2 ½ inches by the WOF cut off 31 inches from length. Then cut this is half, giving you two pieces with the final cut 2 ½ by 16 ½.

Step 2: SEW THE HANDLES
I like to get the handles out of the way so we will start with that.

(Side Note, make sure your bobbin thread is full) Load your ¼ sewing foot first, I will be using the one with a guide.  (Make sure you set your needle to fall in the middle of the ¼ foot. On my machine, it's 43 Brother)


Fold your handle piece in half, right sides together, sew down both sides using a ¼ seam allowance leaving the two small sides untouched.

Turn right side out. Use a pointer tool (pencil, pen, etc.) to poke out the corners.

Top stitch again using ¼ seam allowance, this time going around the entire handle except the open end. Trim if needed, set aside, repeat for second handle.

Step 3: ZIPPER
 (Switch the zipper foot)

It’s time to clip your zipper onto one layer of the PUL. Make sure that you unfold the fabric so you do not sew through both layers just yet. Start by putting your zipper face down onto the right side of the PUL (print side up).

Using the clips instead of pins help reduce holes in your final project. Begin by sewing your zipper onto the fabric making sure to lift your foot to past the metal handle of the zipper.

Now you will sew the other side of the zipper to the other end.

Place the end of fabric that does not have the zipper face up onto the table. Then pull the zipper end up and face the zipper right side down, making sure that you did not twist the fabric.

You should see the wrong side of the fabric facing you now.

Clip and sew making sure to lift foot to past metal handle. Turn it right side out and topstitch the fabric by the zipper down. This prevents it from coming up and getting caught into the zipper.


Step 4: SEW BAG
Since I want the zipper to be facing me when I’m using it, I will pull the zipper down by 3 inches.

(In the photos I am showing you, the print is side up but you will want to do this with the wrong side facing you.)

To make sure it stays while sewing clip the two layer together. I did not have enough clips so I clipped one side at a time starting with the side of the zipper that has the stopper.


At this time switch to the basic foot and the seam allowance will be ½ inch. Use the markings on your sewing machine to make sure this is correct.

Once this side is sewn make sure to open your zipper most of the way before clipping and sewing the opposite side the same way ½ inch seam allowance. (I recommend going back and forth over the zipper past a few times on both ends)

Step 5: ATTACH HANDLE
Cut corners of the bag at an angle, then reach through the zipper opening to turn right side out.

Now it’s time to attach handle. At the top of the bag, figure out where you would like the handle. I did not measure this part - I just eye balled the center and placed each end of the handle making a 4 inch gap.


Clip and baste with a 1/8 seam allowance.

Turn the bag over and line the other handle up to the one you already basted and repeat.

The final step is to pull up both handles and sew them together with a ¼ seam allowance, I went over this a few times to make it stronger.


Throw the finished bag into the dryer for 5 to 10 mins and you are done and ready to use your new wet bag!

Making your very own wet bag is very rewarding and to customize the size to your needs is even better.


Until next time Sew On, my friends!

Tuesday, November 22, 2016

Review/Giveaway: Fairhaven Health Milkies Breastfeeding Aids

22 comments:


I want to start this review off with a little of my back story on one of the products first, I hope that sharing with you my journey could help you see the importance these products held for me in my breastfeeding journey.

I believe breastfeeding is one of the best things I can do for my little one. Even while I was still pregnant, I knew right away I would want to breastfeed with a goal of 1 year or more.

With my first child I gave up too soon, mostly because it hurt due to poor latching on my part and the lack of knowledge on items that could make it easier on me. As often happens with new moms, I just didn't have anyone to tell me what was available to help me out.

During this pregnancy, I received a collection of products for review from Fairhaven Health, and prepared for our daughter's birth by educating myself on how these products could help me make this time a more successful breastfeeding experience.


To my great surprise, our little angel decided to come early, at 35 weeks gestation. So not only did I have to worry about her health, I had to worry about every drop I needed to be able to save for her and to not risk losing any of to regular nursing pads. Seeing her in the NICU was heartbreaking, and seeing formula being fed to her through her nose was even more heartbreaking. So you can imagine the determination I had to pump my milk since she was not yet able to be in my arms.

Included in the review package I'd received was a product called Milk Saver. This product meant to me that no drop will be lost in the reusable breast pads.

The Milk Saver is worn inside your bra on the side you are not nursing on, to catch all the liquid that would otherwise leak into a nursing pad.

They were lifesavers, ensuring that our little Princess got every bit colostrum and breastmilk she needed to thrive.  It helped us all get through her hospital stay.

When my husband and nurse insisted that I go get something to eat and rest I was not happy to leave, but knew I need to regain my strength.

Pumping for colostrum before your milk has fully come in is totally crazy-making and exhausting. Seriously, the only reason I was able to leave off pumping to take care of myself for short intervals was because I had placed the Milk saver on the breast that had at least a drop come out. Sadly, I do not have a picture of the amount that is caught because I ran back to the NICU, so excited to see that just in 30 minutes to an hour of wearing it, I could give the colostrum it saved to my little girl.


Pumping was not going as great, so whenever I could I would wear the Milk Saver in my nursing bra. This was the beginning of my journey and this product saved my motivation and confidence that I could do this.

Anytime you see your hard work being successful gives you motivation to keep going forward. Now you may understand why I love this product so much. J

Rewinding a bit the Milk Saver comes in a hard case which is nice to keep it clean once washed. And I don’t know about you but after I had my baby her diaper bag became my purse and I love that this can fit in the front pocket.

There is one per box though in my experience I never ended up needing two so one was great for me. Rather it was pumping on one side (or nursing) and having the milk saver on the other, this product was great for catching the let down from the other breast.

The Milk Saver is very comfortable to wear even when I used it while eating at BK, it was very noticeable and for sure not something you would want to be too active in.

The opening for your nipple to go through is wide enough to not make contact so there were no issues there.

Even now at 4 month old I still use it to catch the milk from my breast I am not feeding her on.

Washing it is very easy as well you can place it on the top rack of the dishwasher, though I like to hand wash it and dry it so I can use it right away if needed. Another feature I LOVE is the flexibility of the milk saver. Not only does this help when wearing in your bra but also when pouring the milk into a storage bag freeze.

Which brings me to my next product - the Milkies Storage Bags.

I have some past experience with milk storage bags. In the past, I have read and brought bags that claim that they are leak-proof and then found a bag I was defrosting to be broken and leaking the milk everywhere. Which is again enough to drive you mad!!

Thankfully after using 32 Milkies bags, I have not had a single one leak on me and for that reason, I will continue to use this product as long as my daughter is breastfeeding.

These bags hold up to 200ml, but I have never placed more than 5 or 5 ½ oz. into one bag (about 150-160ml). In each box comes 50 storage bags.

Now I would like to point out one of my FAVORITE details of these bags. On each bags there are guideline to help you keep your hard working liquid gold fresh!  I could go into detail of how sad it is that some cannot remember the details of how to handle the frozen milk (cough cough my husband) but in all seriousness for those long nights it was nice to have that reminder there to help.


I also like there have a double zipper on the bag adding an extra level of protection against your milk leaking out.

As for the label, I use it to track the date and time that I pumped.

Another detail I like over other bags I've tried is that the sides of this bag are bigger, making it easier to manage, and I think that is also the reason I have not had any leaks.

The next product I received is the Milkies Freeze! Since we have a small fridge, this container allowed me to be able to freeze the bags flat for easy use, and also to use the oldest milk first just in case I forgot to write on the bag the time and date. Which sadly has happened but with the Freeze it didn’t matter much since its doubles as an organizer. 

These tools work together to make the entire process go smoothly:

Simply milk into the bag, close and place onto the metal (which in my opinion helps it freeze faster as well as flat), place the bag on the top and pick from the bottom, warm and feed. I LOVE EASY STEPS!!!

Now, I do want to point out that though this is an awesome product, it’s mainly for my husband's use since I breastfeed her, and he does the bottles when I need a kids-free outing.

And from his view all he has to do is pull one bag from the bottom, thaw and pour into bottle. Ladies, it even says on the cover of the Freeze which area to pull from! YES! That’s two products that I don’t have to repeat myself on how to use.

Another way I was able to freeze and store my milk was by using the Milkies Milk Tray. This tray is AWESOME!!!!

Each slot holds 1 ounce and all you do is take how many ounces you need and place it in the bottle to thaw and feed. Now, I loved the bags, but I have to say this way is best for when you are using the milk saver and instead of wasting a bag or risking pouring little by little in a bottle until you get enough to fill a bag.

This way, you can freeze that milk or colostrum right away and ensure it stays fresh for your little one. Please make sure you store them towards the back so you don't run into it defrosting and refreezing. The Milkies Milk Tray is recommended to be handwashed, and it is very easy to wash it that way.  Unlike the bags, it is reusable so there is no waste, and did I mention we had a small fridge? These are stackable, and do not take up a lot of space.

After it freezes in the tray we pop them out like you would an ice tray, and place them in a zip lock bag. At this time we do not have a deep freezer, but once we get one this will be the way we mostly freeze our milk and then use the bags less often.

Again, I mostly breastfeed her but my experience with these were when we did not have any bags frozen and we had to go to her pediatric cardiologist. This is not an appointment we could miss, but I knew I needed to be able to feed her while on the heart monitor so she would be calm.

Thankfully, we had some 1 oz bars frozen, so I popped 3 in a bottle and left for the appointment. They thawed on the way, and I only had to run it under the warm water for a little before giving it to her.

Fortunately, breastmilk doesn’t need to be warmed like formula, so this saved us this appointment visit, because if she wasn’t eating and being still we would have had to go back to the NICU.

After that, these became my husband’s favorite method, but I prefer him to use the bags since you  need to wear gloves to handle the milk stored with the Milkies Milk Tray.

Yes, you could easier just make sure your hands were washed before using, but as our Princess was a preemie I demand extra measures.

 Another product I tried out was the Milkies Nipple Nurture Balm. I actually started using this before she was born.

Since I will not be posting pictures, imagine if you will dry cracked nipples - - not something any women wants to deal with on top of being pregnant!

Milkies Nipple Nurture Balm is organic and lanolin-free, and to me a product where I can read and know what each ingredients is BONUS!!

To give you an idea of the texture, I would say it is a little thicker then oil and thinner then petroleum jelly. Which, when applying to your nipple, is a GOD send, as it clings to the skin without running and without pulling at tender flesh.

So, before I even pumped, this product was helping me with protection. I then started using it before pumping, and trust me a little goes a long way in this balm. Though it says it's baby safe, after tasting it myself I would not want to give that to her.

I can’t really pinpoint what it tastes like but olive oil and shea butter is close, which are among the 5 ingredients, but still nothing I could want to eat. I will say it is nice to know that if, in the moment, I have some left on my nipples that it would not harm her.

Currently, I am using the Nipple Nurture balm to help protect against cold air and dryness, and it is working perfectly - I have not experienced cracked nipples since I started applying it. BLESSINGS!

The final product that I reviewed is the Milkies NursingBlend breastfeeding supplement.

I took these for one month, which is one bottle's supply. In each bottle there are 90 capsules and you are to take 3 a day. I started taking these when she was 2 months old, as in the beginning I followed my doctor’s advice and only took the pain meds and prenatal vitamins. Once cleared to take other supplements, I started these.

On the bottle it states that it is designed to improve the Breast Milk Quality and Production. It claims to have a formulated specifically for breastfeeding mothers to encourage plentiful nutrient-rich milk production.

I want to make it very clear my views on this.

Breastfeeding is an amazing thing that is wonderful for your child. But there are some women that cannot produce milk, or make a lower volume of milk then others. And there are different reasons as to why this is happening.

A supplement may  or may not help, but you have to do what is best for you. So please do not take this review as a guarantee that Milkies Nursing Blend will increase your milk production, and ALWAYS seek the advice and guidance of your local CLC or doctor.

Now with that being said, again I took this product after 2 months of her being born and I cannot say that if it improved my milk or increased the volume. During the time I took this supplement, it did improve my energy and for that I say it was more like getting the needed vitamins for me to be able to get through the day. There was no negative result, but I had no noticeable change in my own milk production.

Over the month I have been taking them, I have been trying to figure out what they smell like and it’s not unpleasant like my prenatal so in that it’s a plus.

For the people that have tried different herbal galactagogues (foods or supplements meant to promote or increase breast milk flow) such as Fenugreek, this product has that in it has well. Again I cannot confirm that is will improve your milk production but if you have used Fenugreek, and are looking for other ways to consume you could try this product.


Overall my must haves to help you with your breastfeeding journey is the Milk Saver, Milk Tray, Nurture Balm and the Freeze, and the Milkies Nursing Blend supplement may help if you are struggling. I hope you enjoyed this review and that you find a product that could help you in your journey.

Each of the items mentioned in this review are available on their website, at various local retailers, and through Amazon.

I'm very excited to announce that Fairhaven Health is offering one of our readers everything I reviewed!  Read on to see how to enter this amazing Giveaway - this would be a lovely baby gift for your favorite new parents!


One winner in the US (including APOs) or Canada will receive the following prize package from Fairhaven Health, worth a total of $140.70:

1 Milk Freeze ($19.95), 1 set Milk Trays ($21.95), 1 Milk Saver ($27.95), 1 set Milk Storage Bags ($11.95), 1 month supply Nursing Blend Supplements ($28.95), and 1 jar Nipple Nurture Balm ($11.95).

To enter the giveaway, please leave a comment in this entry as instructed by the Giveaway Tools Entry Form below. This will open up additional optional entries to increase your odds of winning. (If you don't leave a comment, any additional entries will be void.)

This giveaway is open to Canadian and US residents (including APO addresses) and will end just before midnight ET on 12/6. 

The winners will be notified by email within 24 hours after the end of the giveaway. In order to claim the giveaway prize, the winner will need to respond within 24 hours of notification, or an alternate winner will be selected.

Once the winners have responded and confirmed, their first names will be posted on our Giveaways  page.

Good luck!